ComfyUI common issues
Use this page to identify and resolve common issues with ComfyUI on Olares.
Need more help?
If you are encountering an issue that is not listed here, refer to Troubleshooting flow.
How to migrate to the new ComfyUI after upgrading to Olares 1.12.6
Use this section if you upgraded to Olares 1.12.6 and already had ComfyUI Shared installed. If you are installing ComfyUI for the first time on Olares 1.12.6 or later, install ComfyUI directly from Market.
Olares 1.12.6 updates the shared app architecture. The old ComfyUI Shared app can still run after the upgrade, but it cannot receive future updates. To keep ComfyUI up to date, uninstall the old app without deleting local data, then install the new ComfyUI app from Market.
WARNING
When uninstalling the old app, do not select Also remove all local data. Selecting this option may delete your models, plugins, workflows, and input/output files.
Migration steps
- Open Market and go to My Olares.
- Find ComfyUI Shared, click the dropdown arrow next to its operation button, and select Uninstall.
- In the Uninstall window, leave Also remove all local data unselected, then click Confirm.
- In Market, search for "ComfyUI" and click Install.
- On the app details page, check Information > Compatibility. If it shows
Olares >=1.12.6-0, you are installing the new version. - After installation, open ComfyUI and check that your models, plugins, workflows, and input/output files are available.
What gets migrated
After the new ComfyUI is installed, data is migrated automatically as follows:
| Data type | Old location | New location |
|---|---|---|
| ComfyUI core (plugins, workflows, etc.) | External/<your_hostname>/ai/comfyui/ | Data/comfyuisharev3/comfyui/ |
| Models | External/<your_hostname>/ai/model/ | Common/comfyui/model/ |
| Output files | External/<your_hostname>/ai/output/comfyui/ | Common/comfyui/output/ |
| Input files | External/<your_hostname>/ai/comfyui/ComfyUI/input/ | Common/comfyui/input/ |
WARNING
After migration, upload new models and input files to the new locations under Common/comfyui/. The new ComfyUI no longer uses External/<your_hostname>/ai/ as its active file location.
The migration runs each time ComfyUI restarts. If files are later added to the old locations, ComfyUI will move them to the new locations on the next restart and delete the originals from External/<your_hostname>/ai/. To avoid confusion, upload new files directly to the new locations.
Model paths after migration
The new ComfyUI generates extra_model_paths.yaml automatically and maps its standard model categories to the shared model directory. You normally do not need to configure this file after migration.
Custom or node-specific model categories might not be included in the generated mappings. If a migrated model exists under /Files/Common/comfyui/model/ but ComfyUI or a custom node cannot find it, see Configure additional model paths.
ComfyUI cannot start
ComfyUI fails to start, stops unexpectedly, or behaves abnormally.
This is usually caused by insufficient resources or incorrect GPU allocation. To resolve this:
- Check your system resources. If your CPU or memory usage is maxed out, stop other resource-intensive apps.
- If system resources look fine, go to Settings > Accelerator and check your GPU mode:
- If you are using Memory slicing, make sure ComfyUI is bound to the GPU and has enough VRAM allocated.
- If you are using Exclusive, make sure the exclusive app is set to ComfyUI.
- Wait a moment, then try to launch ComfyUI again.
Launcher log shows errors
Error messages in the Launcher logs do not necessarily indicate a system failure. During startup and plugin scanning, ComfyUI often logs non-fatal errors for missing optional dependencies or environment checks, even when running normally.
If ComfyUI starts successfully, most of these messages do not require action. Investigate logs only if ComfyUI fails to start, a workflow cannot run, or a plugin stops working.
ComfyUI cannot find a model in the shared model directory
After migrating to ComfyUI v3 or installing the new ComfyUI directly on Olares 1.12.6 or later, a workflow may report a missing model even though the model file exists under /Files/Common/comfyui/model/.
This usually happens for one of two reasons:
- The model category is not mapped in
extra_model_paths.yaml, so ComfyUI does not load models from that folder. - ComfyUI detects the model, but the custom node looks up a different model category.
The following examples use two models that are already stored in the shared model directory:
/Files/Common/comfyui/model/
├── detection/
│   └── mediapipe_face_fp32.safetensors
└── ultralytics/
    └── bbox/
        └── face_yolov8m.pt
The models demonstrate two different issues:
mediapipe_face_fp32.safetensorsdoes not appear in Model Library because thedetectioncategory is not mapped.face_yolov8m.ptappears in Model Library, butUltralyticsDetectorProvidercannot find it because the node looks up theultralytics_bboxcategory.
Model does not appear in Model Library
In this example, Model Library shows no models under detection, even though mediapipe_face_fp32.safetensors exists in the corresponding folder.
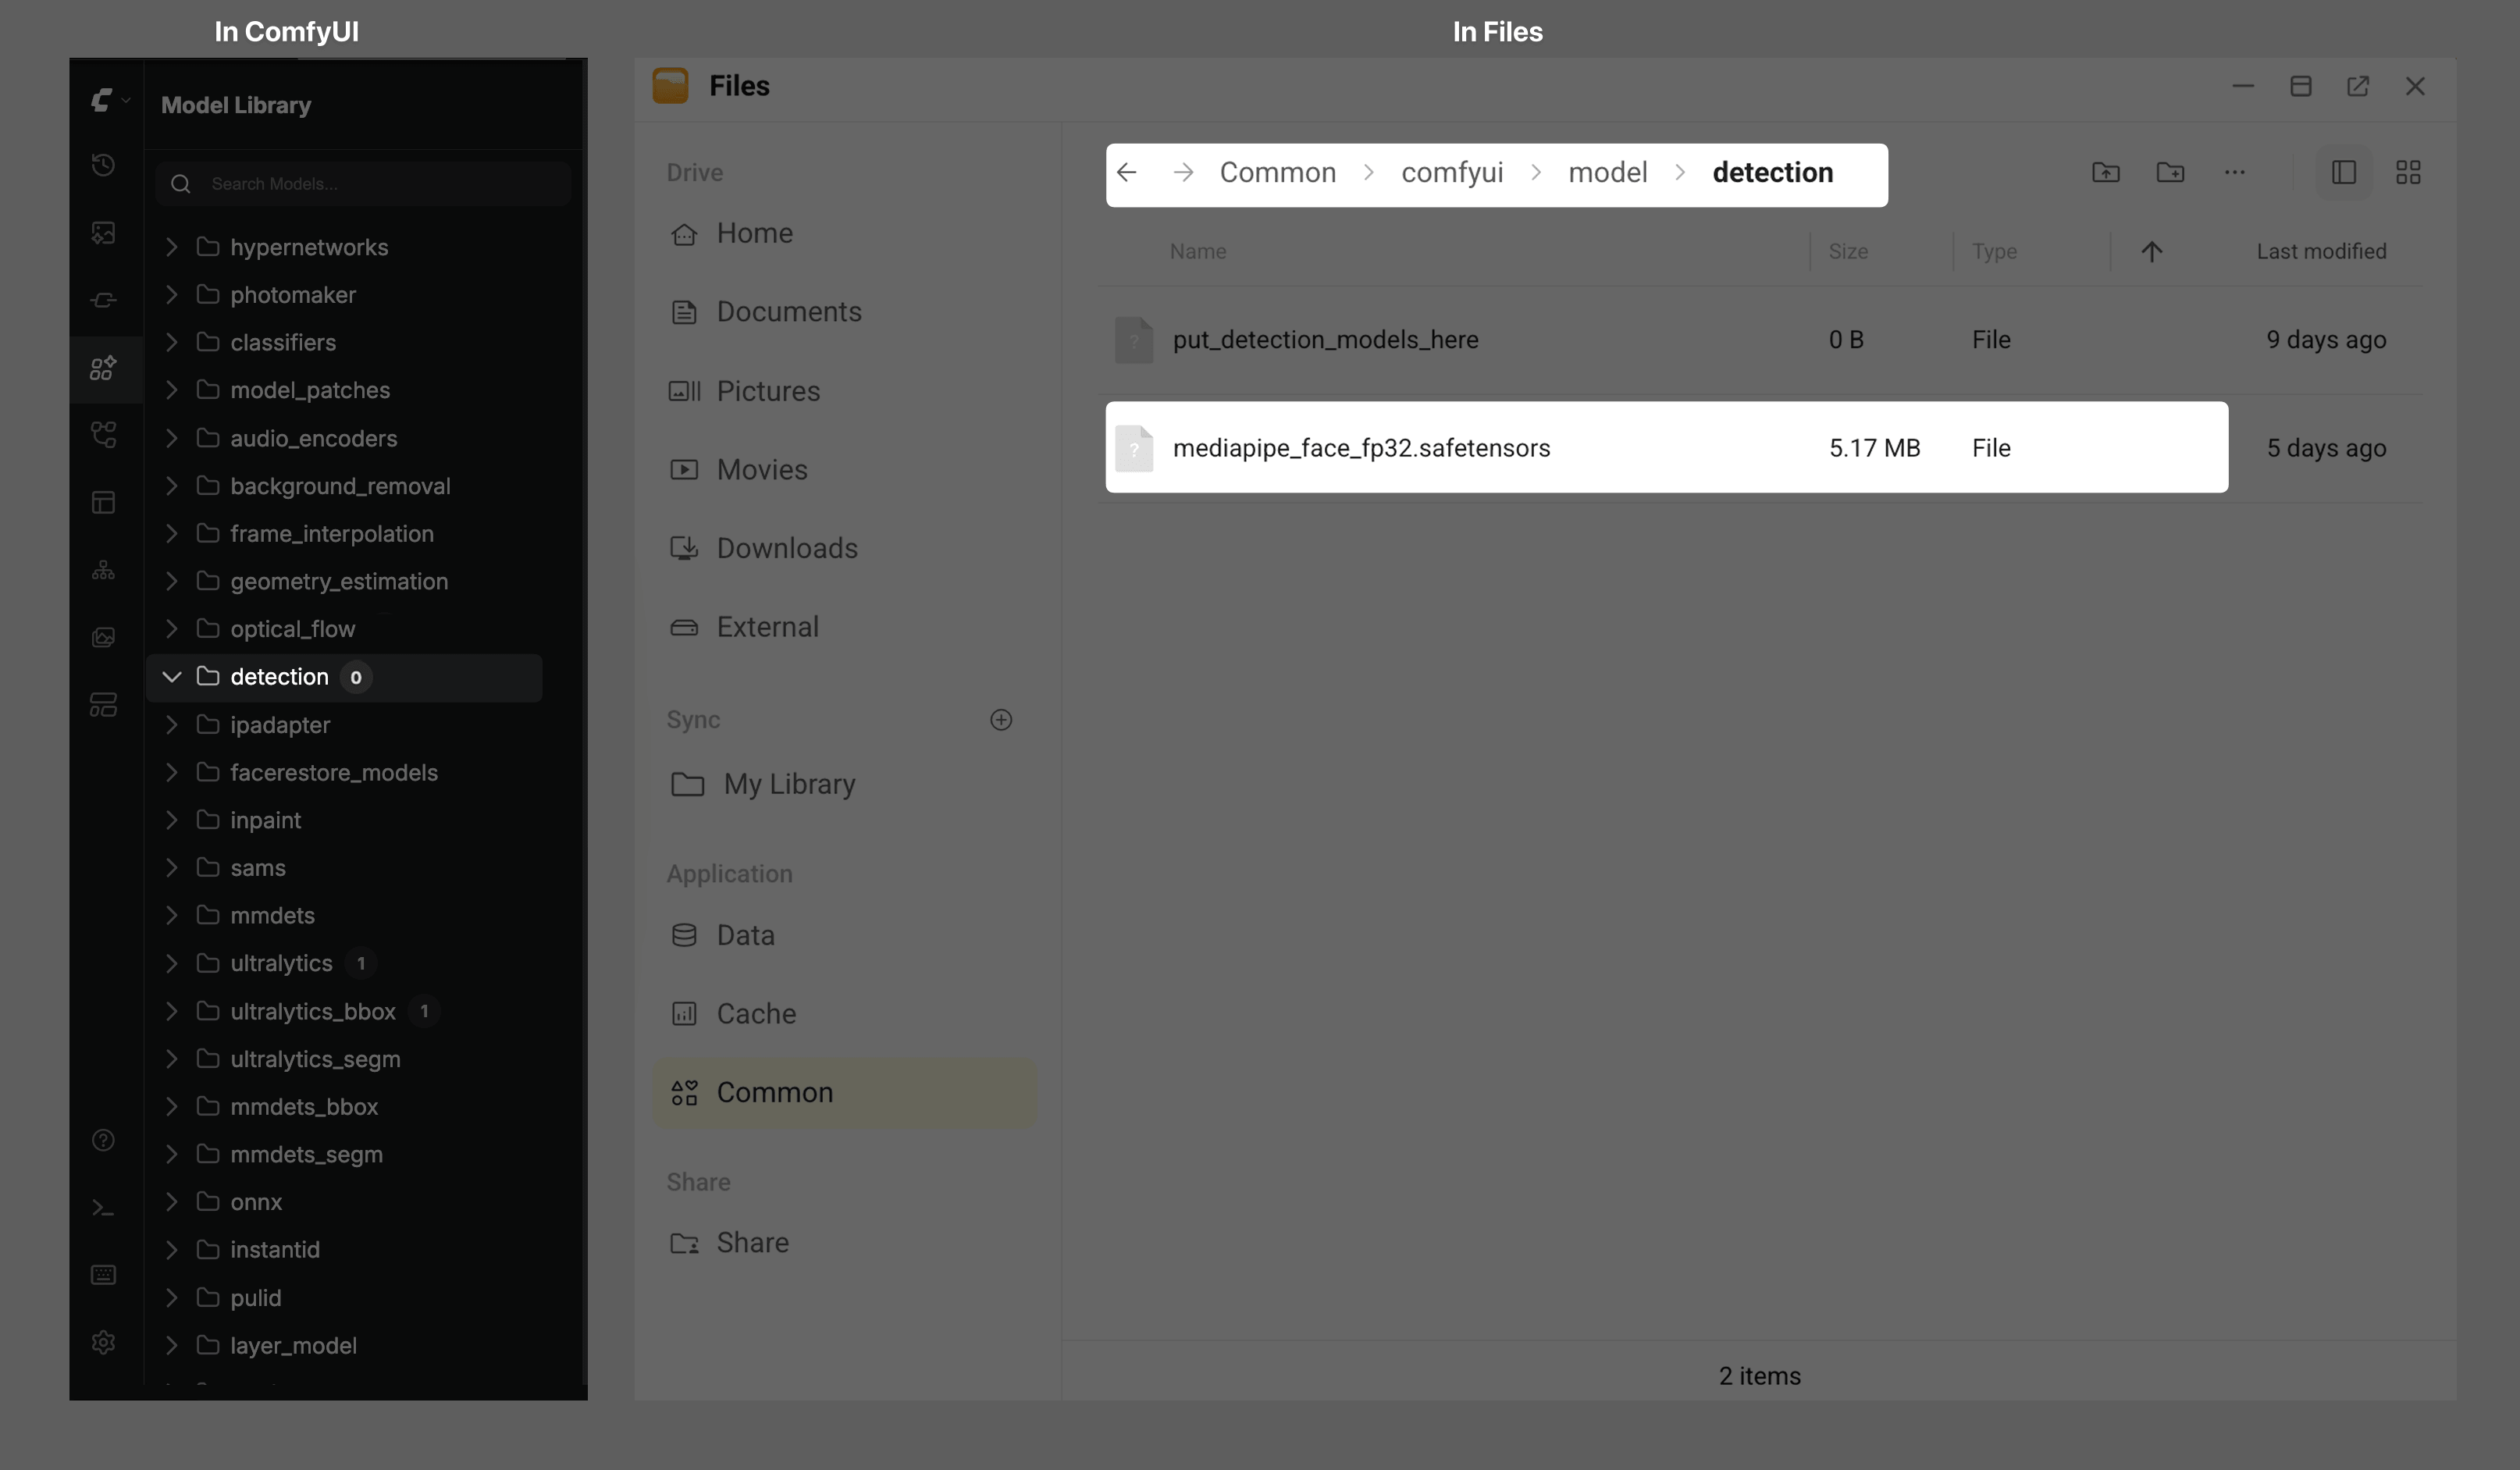
To resolve the issue:
Add the following mapping under
olares_shared_modelsinextra_model_paths.yaml:yamldetection: detection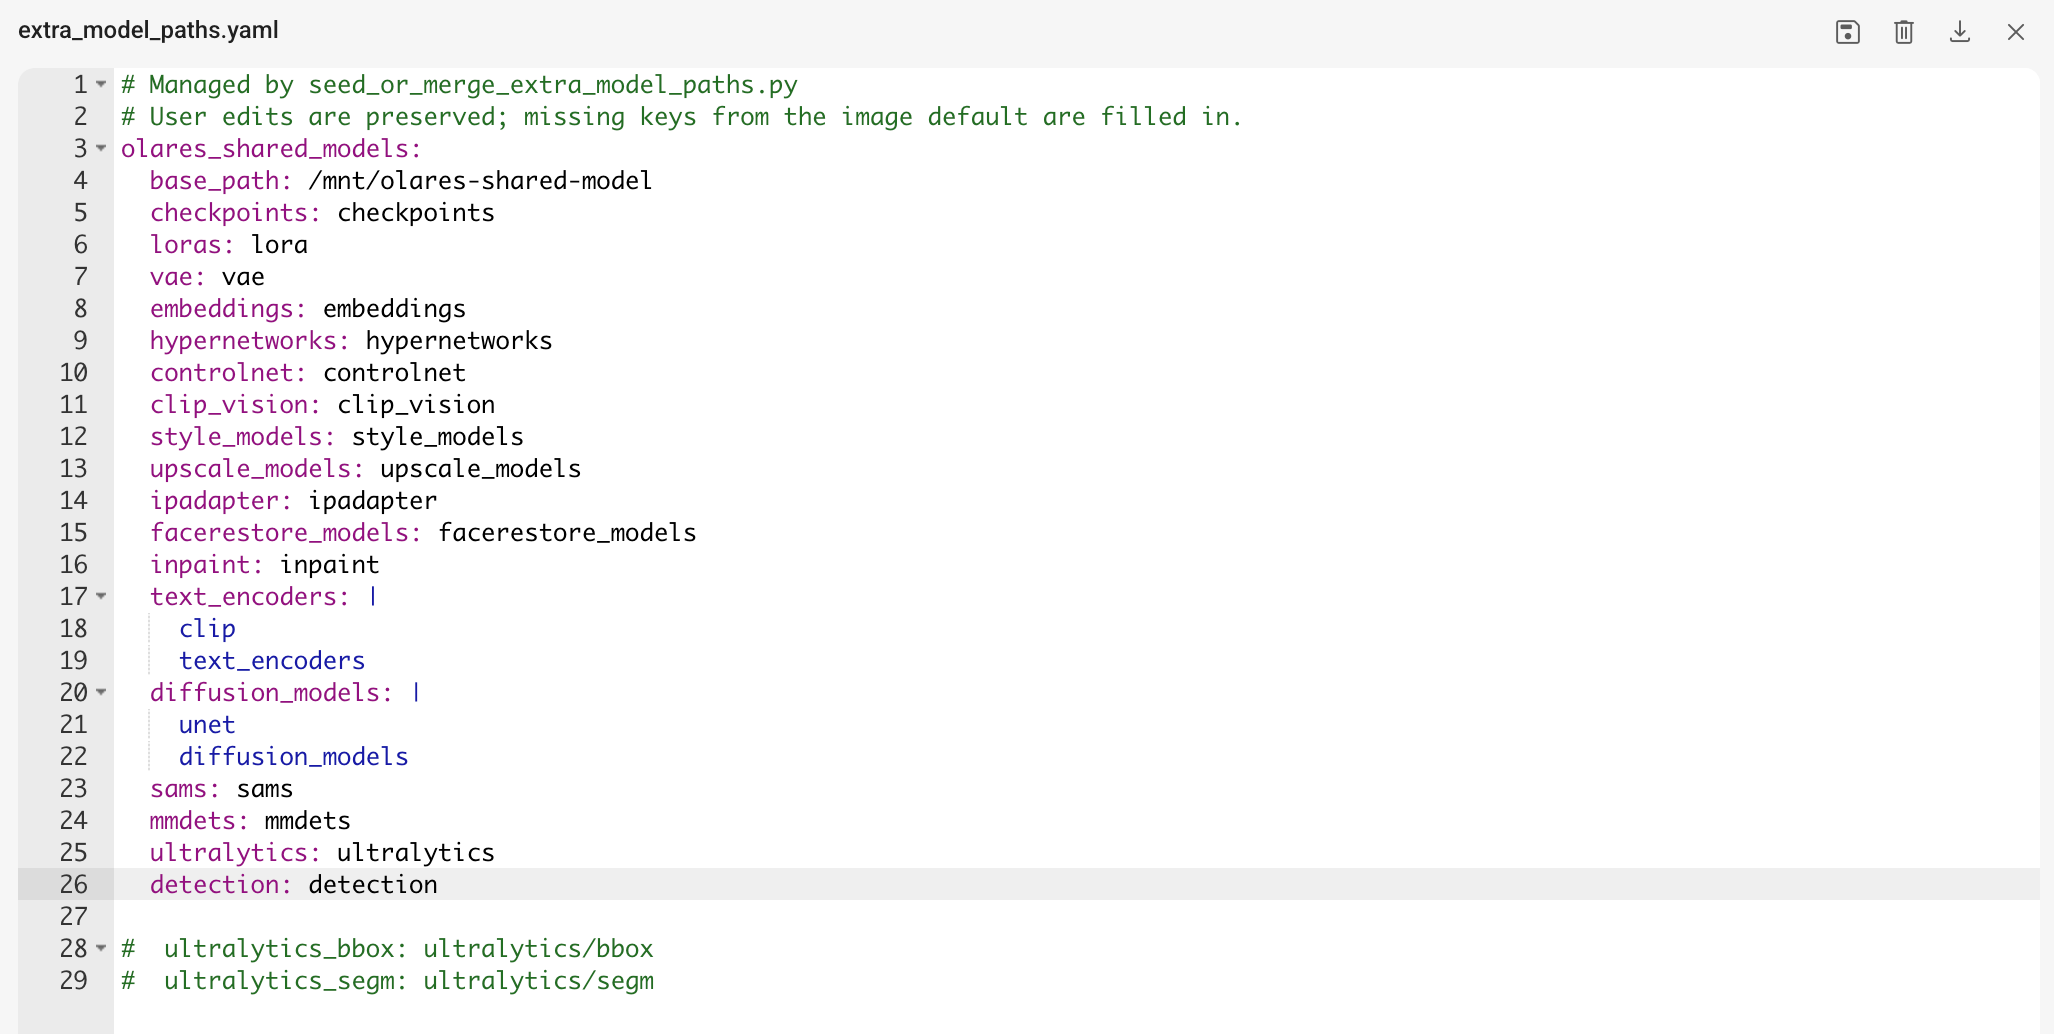
For instructions on editing the configuration, see Configure additional model paths.
Save the configuration and restart ComfyUI.
In ComfyUI startup log, look for the following entry to confirm that the mapping was loaded:
textAdding extra search path detection /mnt/olares-shared-model/detection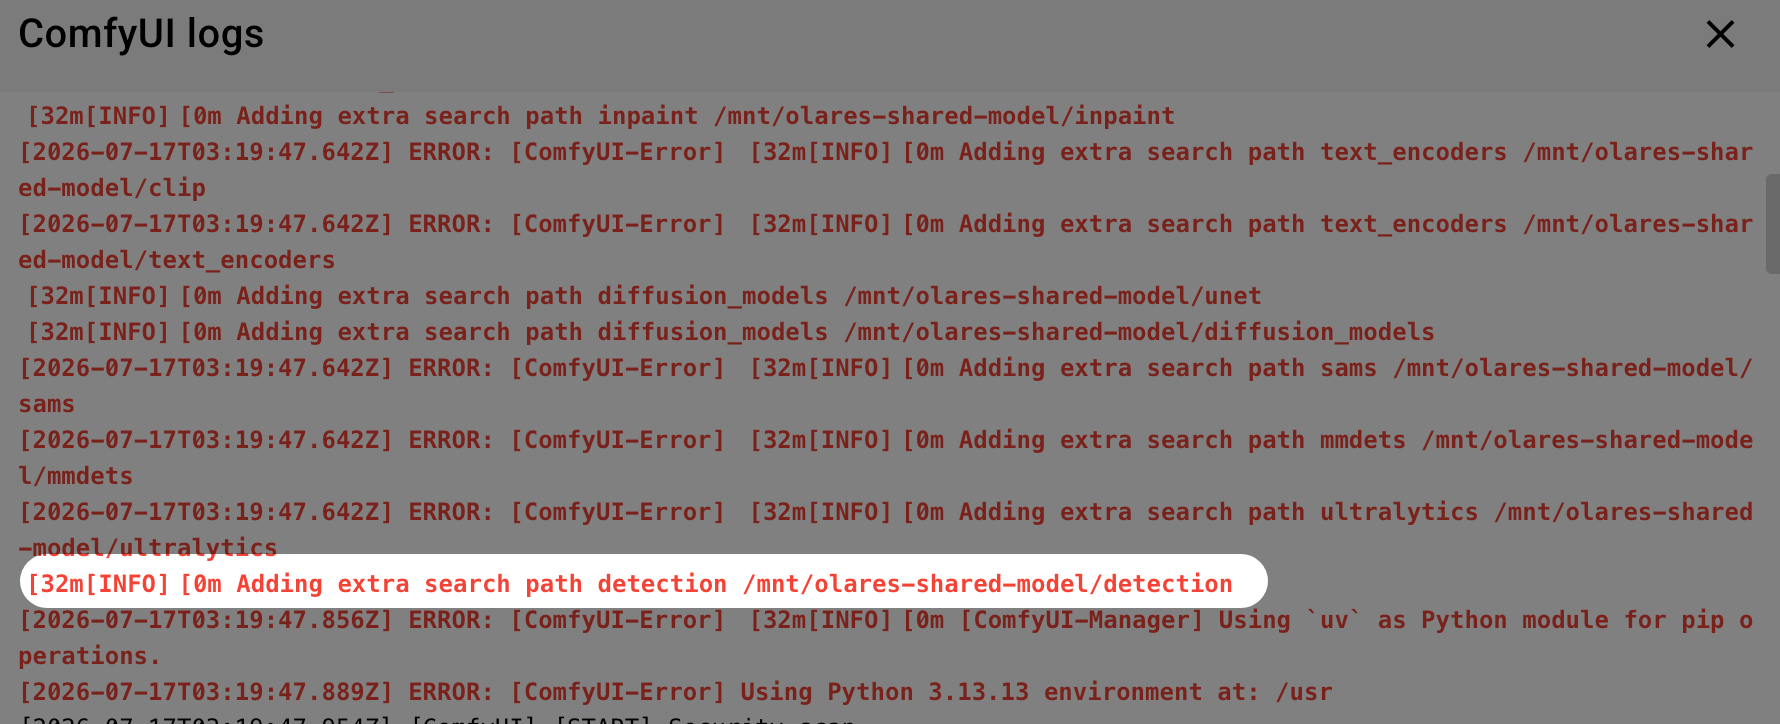
Refresh ComfyUI and search for the model again. It should appear under
detectionand become available to the workflow node.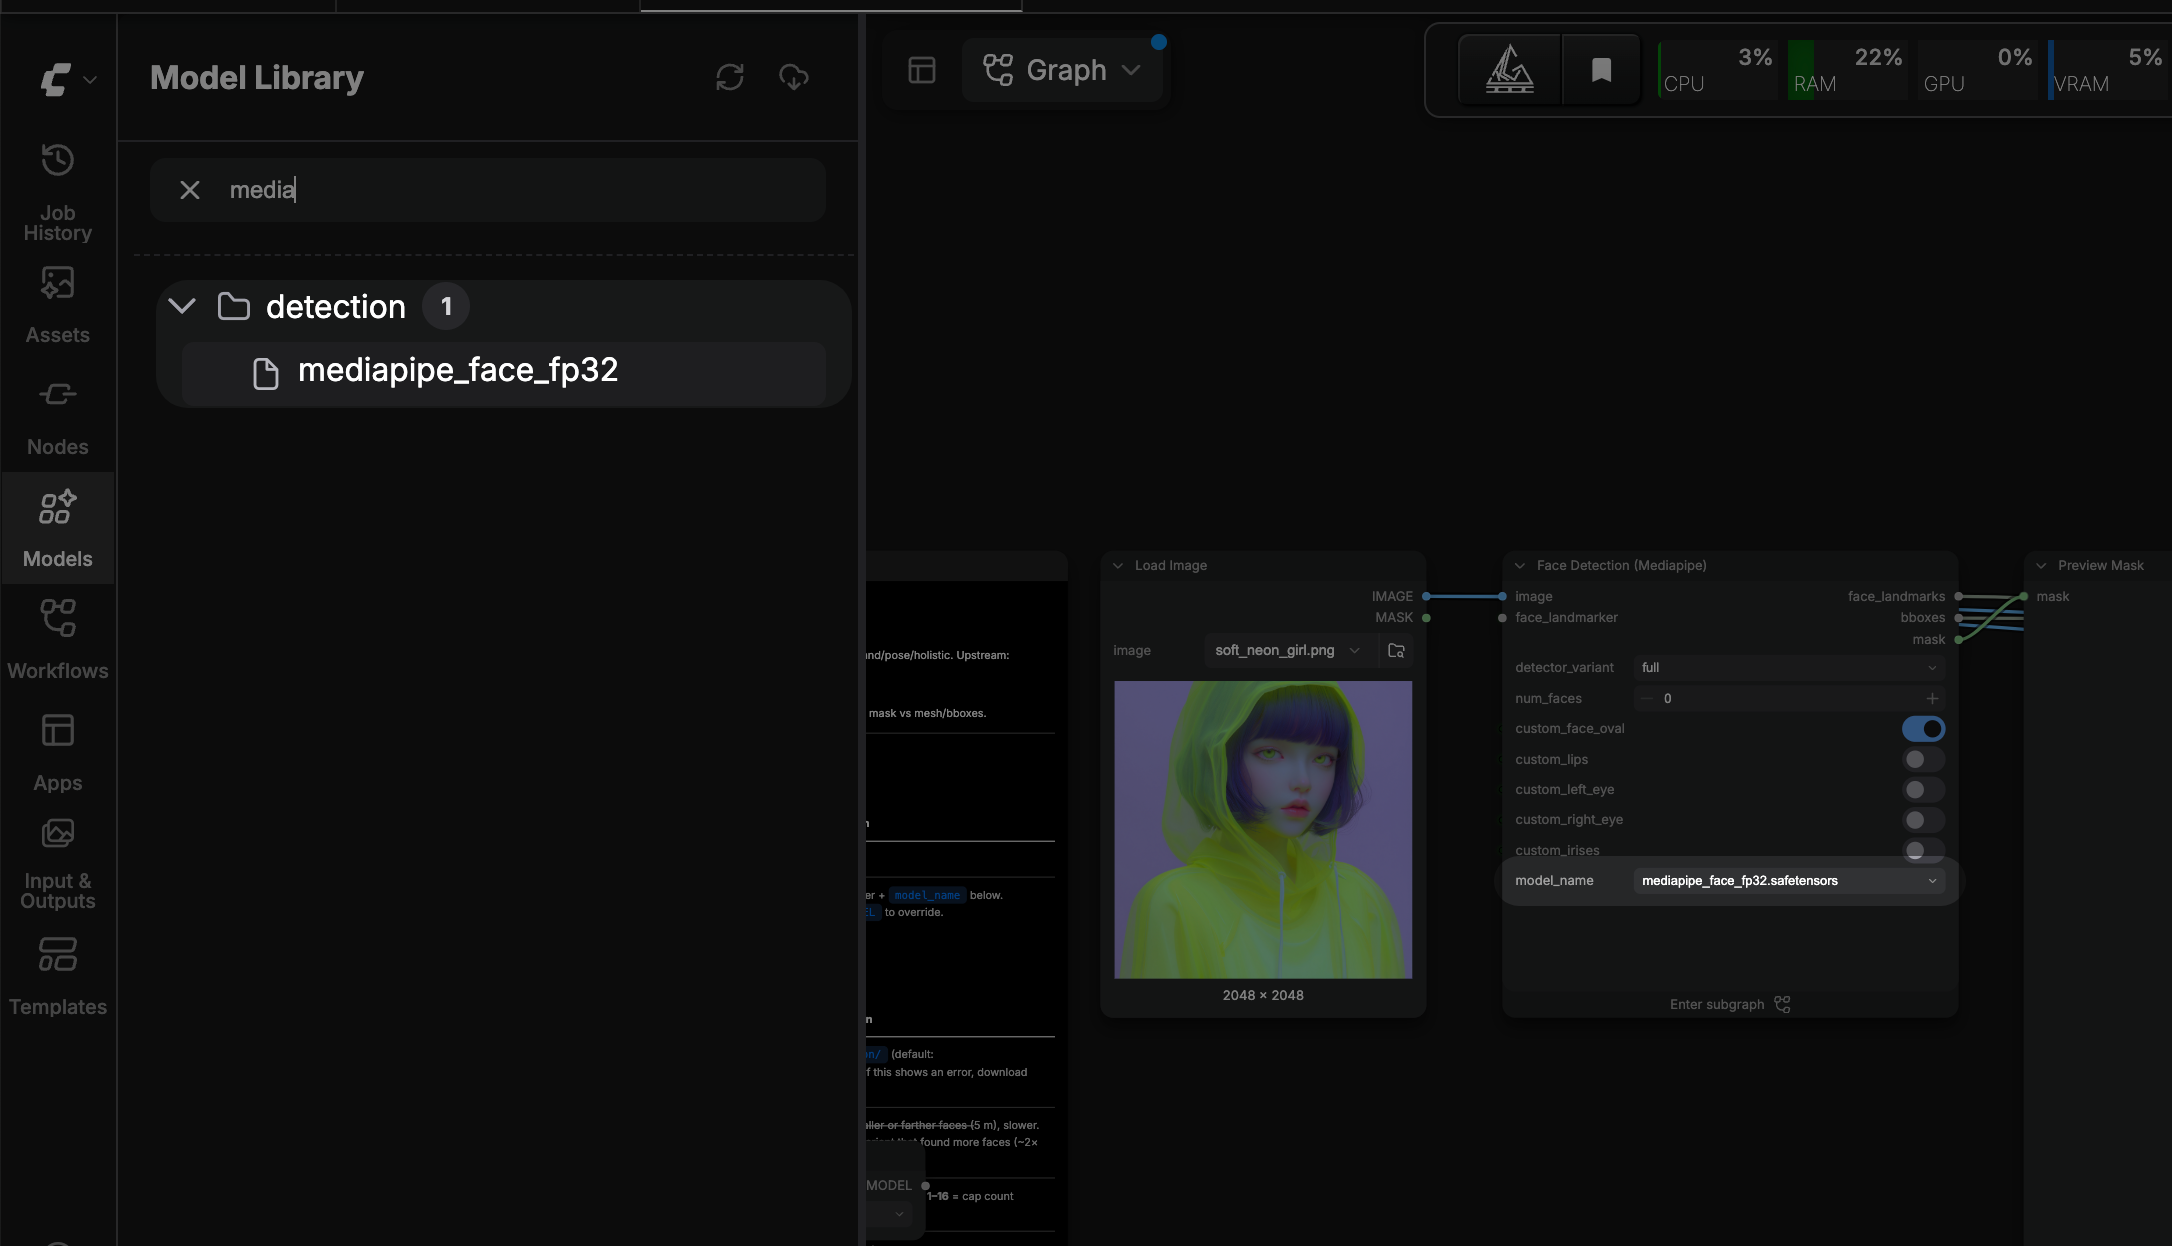
If the model still does not appear
- If the log entry is missing, check the category name, relative folder path, YAML indentation, and the location of
extra_model_paths.yaml. - If the log entry appears, check the model file location, file name, and file format.
Model appears but a custom node cannot find it
In this example, ComfyUI detects face_yolov8m.pt under ultralytics/bbox, but the ImpactPack/UltralyticsDetectorProvider node looks up the ultralytics_bbox category.
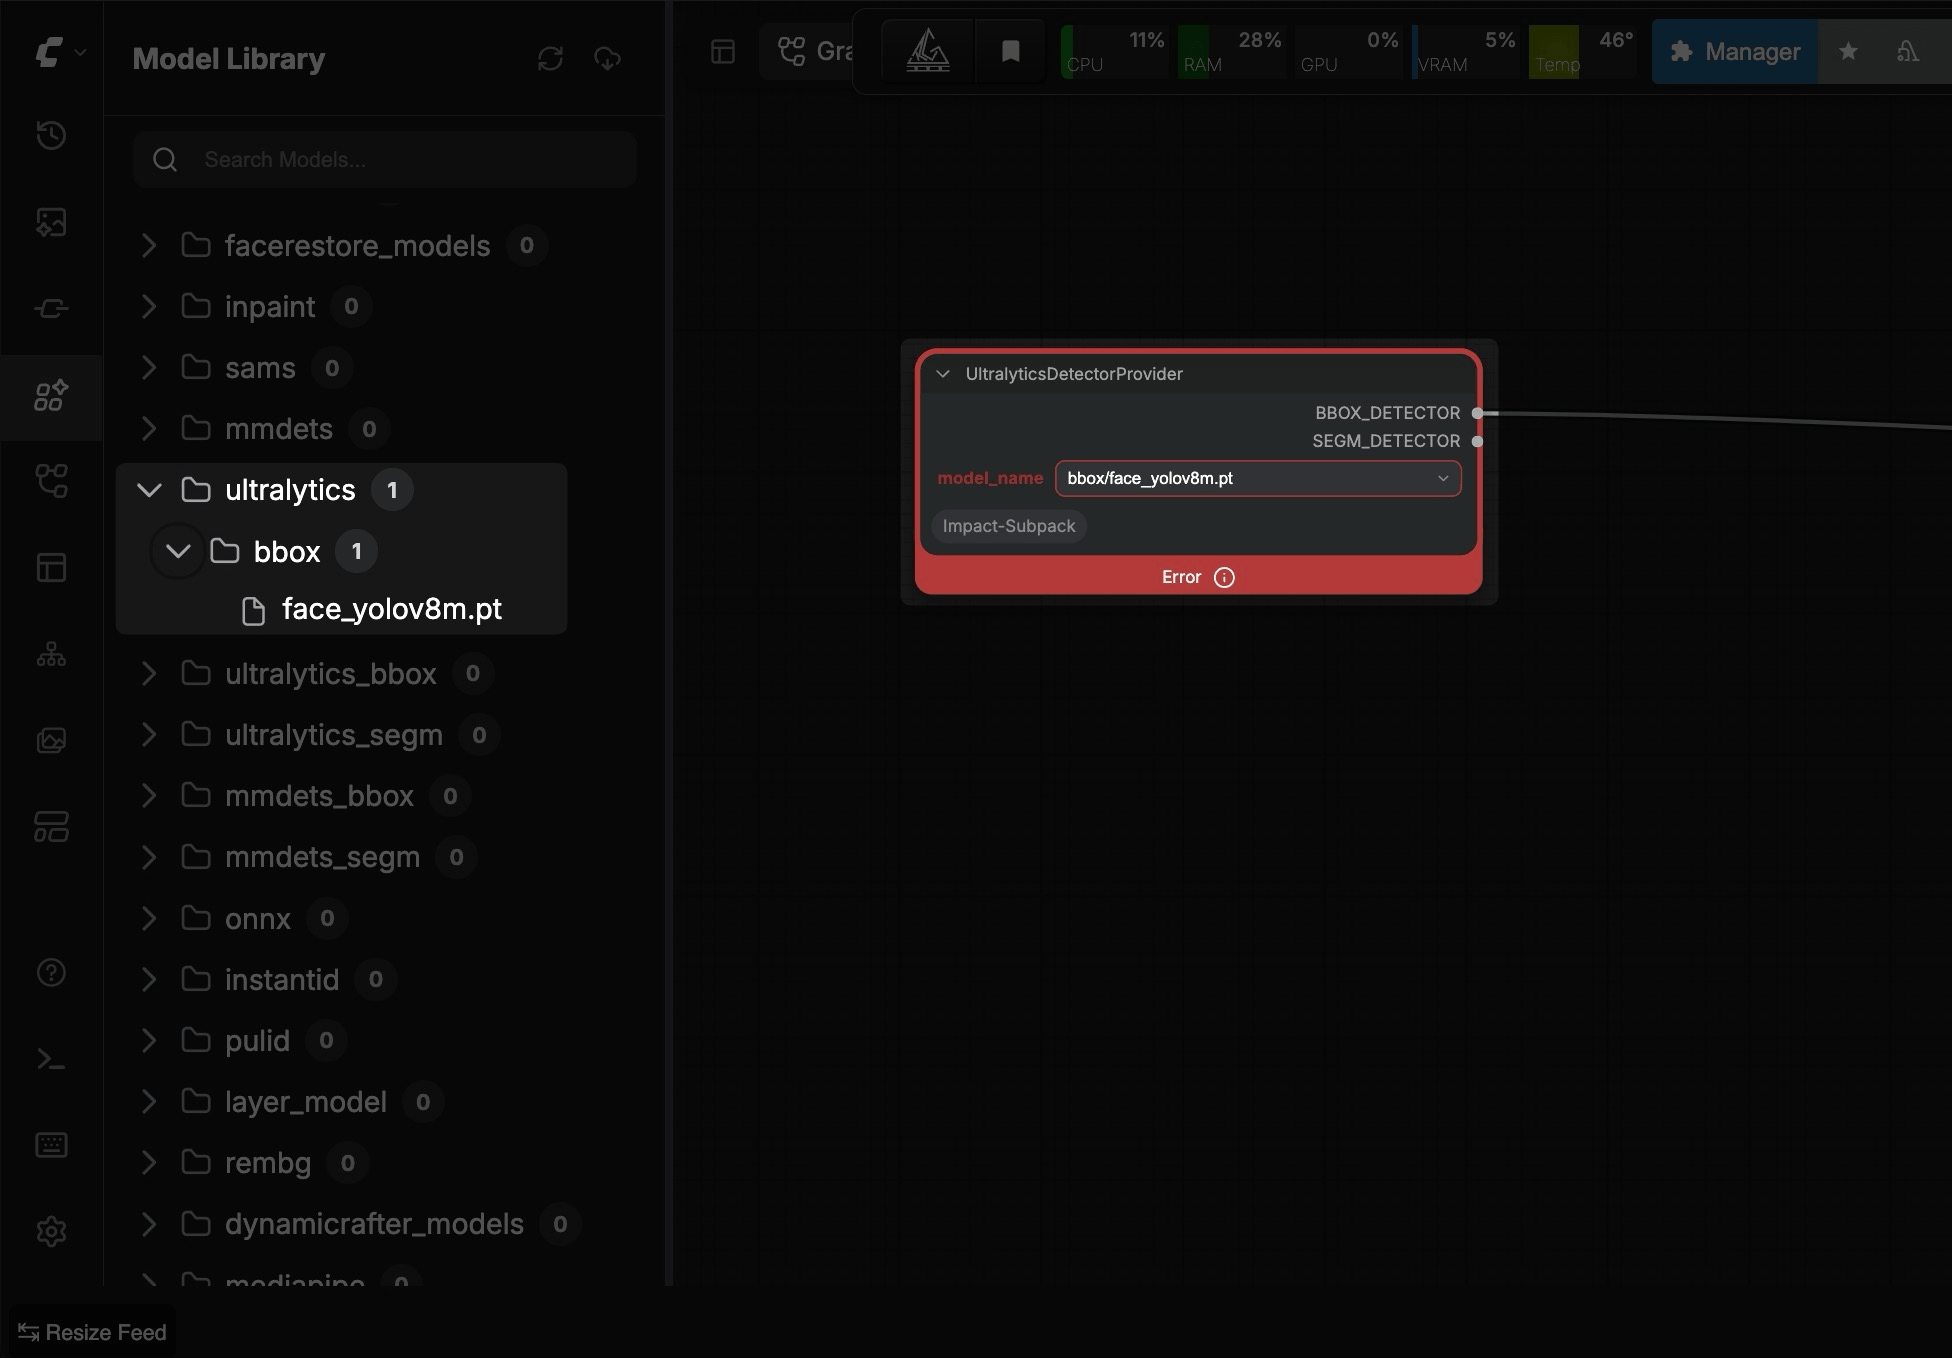
To resolve the issue:
Check the custom node documentation or error message for the category it expects.
Compare that category with the model's current category in Model Library.
If the categories differ, map the category expected by the node to the model's existing folder.
For this example, add the following mapping under
olares_shared_models:yamlultralytics_bbox: ultralytics/bboxThis mapping allows the node to load the model from its existing folder. You do not need to move or duplicate the model file.
For instructions on adding the mapping, see Configure additional model paths.
Save the configuration and restart ComfyUI.
Reopen the workflow and confirm that
face_yolov8m.ptappears in theUltralyticsDetectorProvidermodel selector.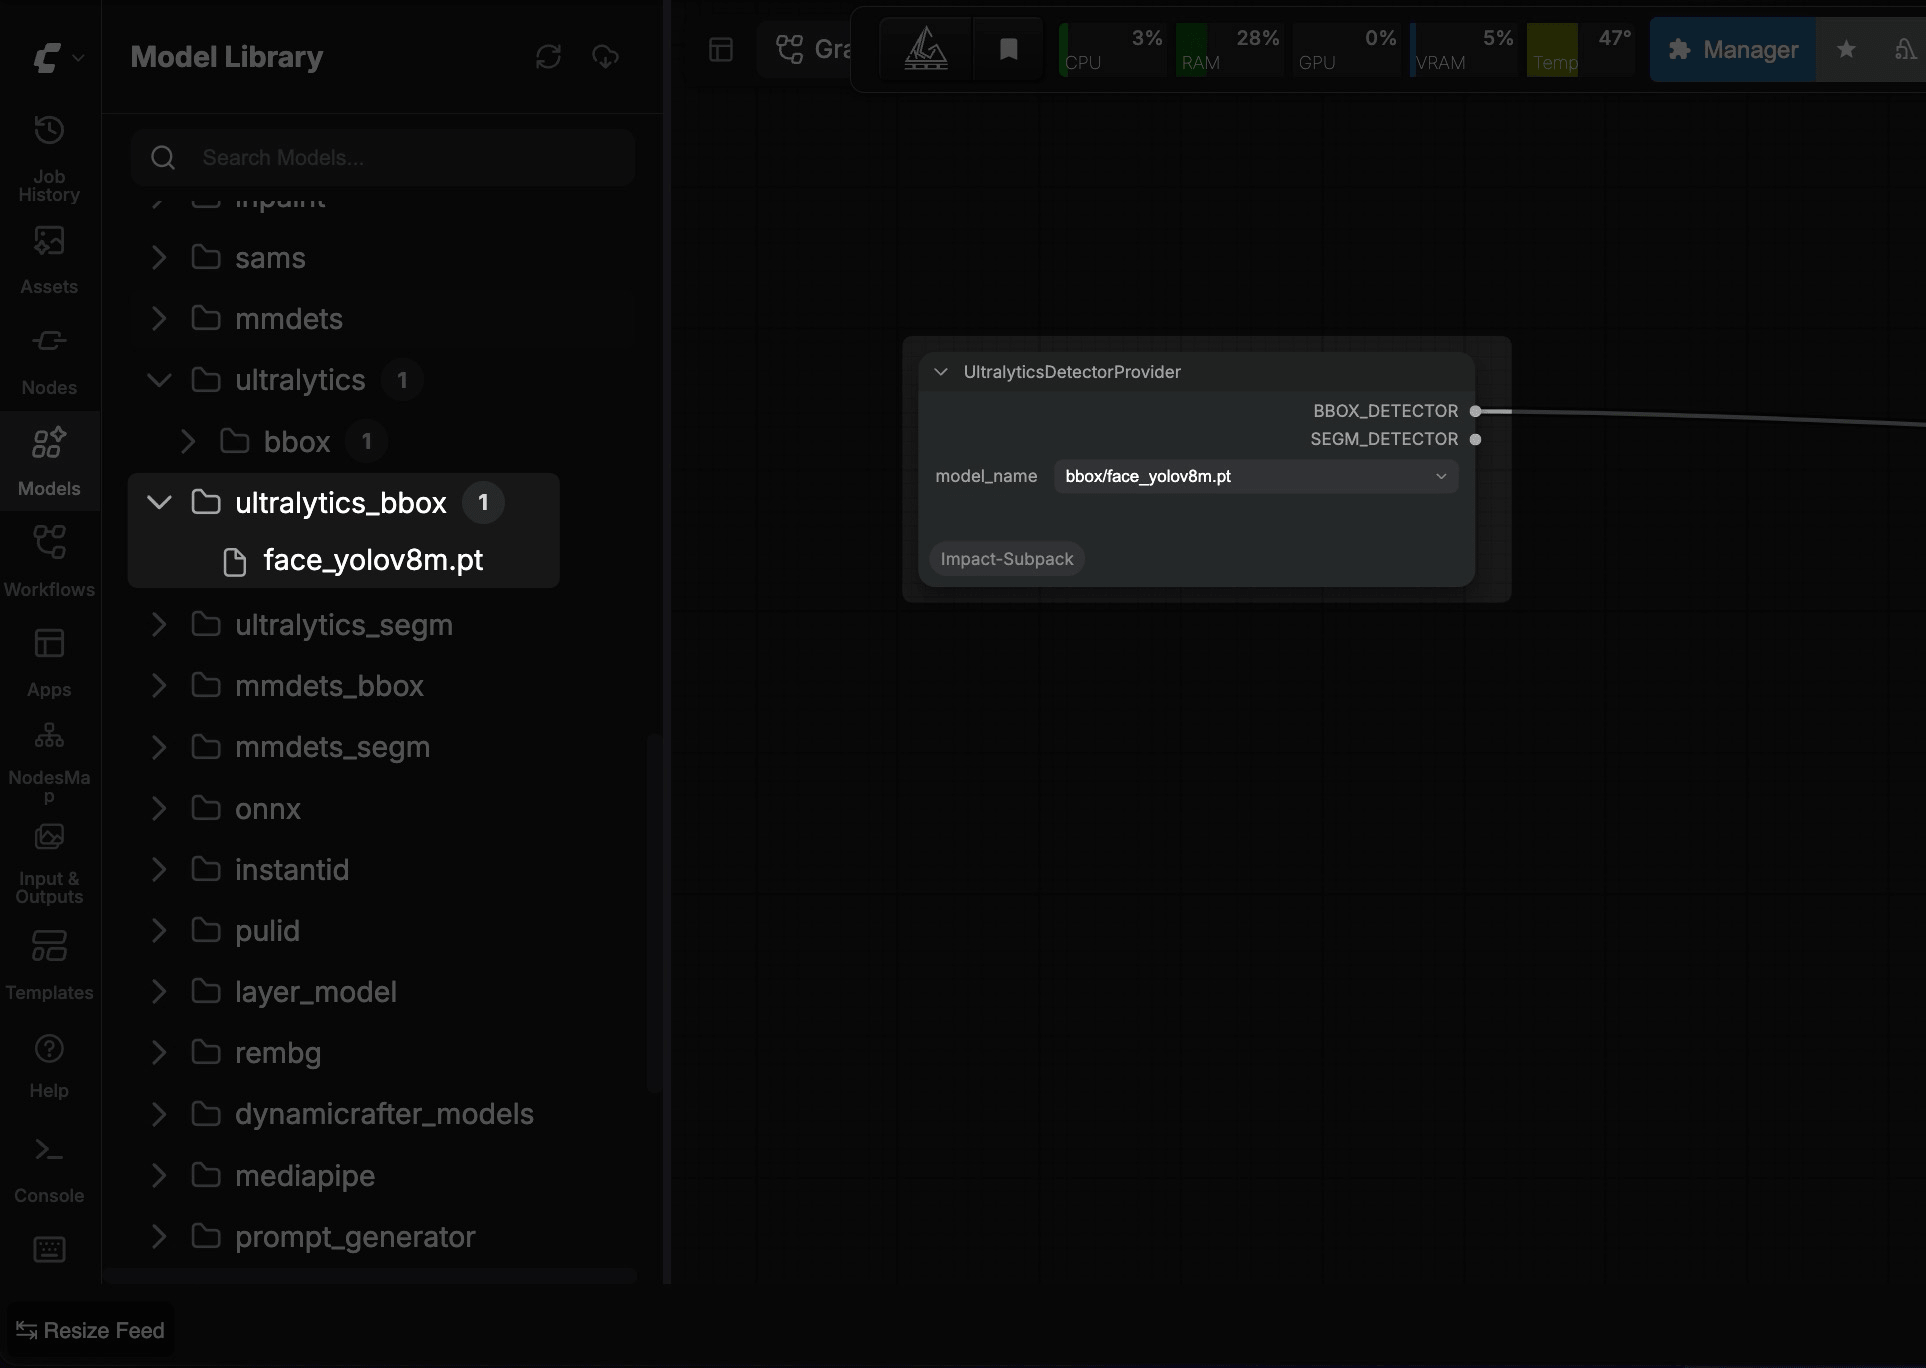
ComfyUI fails to start after upgrading to v1.0.37 or later
This issue may occur after upgrading to ComfyUI v1.0.37 or later.
After the upgrade, ComfyUI app may fail to start and show an error like:
main.py: error: unrecognized arguments: --normalvramThis means a custom launch argument from a previous version is still in use, but the new version no longer supports it.
To fix this:
- Open ComfyUI Launcher and go to Lab from the left sidebar.
- In the Manually edit extra arguments field, remove
--normalvrammanually and click SAVE MANUAL ARGS. Alternatively, click RESTORE DEFAULT to reset to the default launch arguments. - Verify that Current full launch command at the top no longer contains
--normalvram. - Go back to Home in ComfyUI Launcher, then click Start to launch ComfyUI.
Models cannot be downloaded directly to Olares
Some models require login, access approval, a token, or manual confirmation before they can be downloaded. These models cannot be downloaded directly to Olares through ComfyUI Launcher or Server Download.
To solve it, find the download link using one of the methods below. Then download the model manually and upload it to the correct folder in Olares Files.
Method 1: Check the template notes or Model Links section
Some official templates include notes or a Model Links section that lists:
- The required model file
- The download URL
- The expected storage location
If available, copy the download URL or open the model page directly.
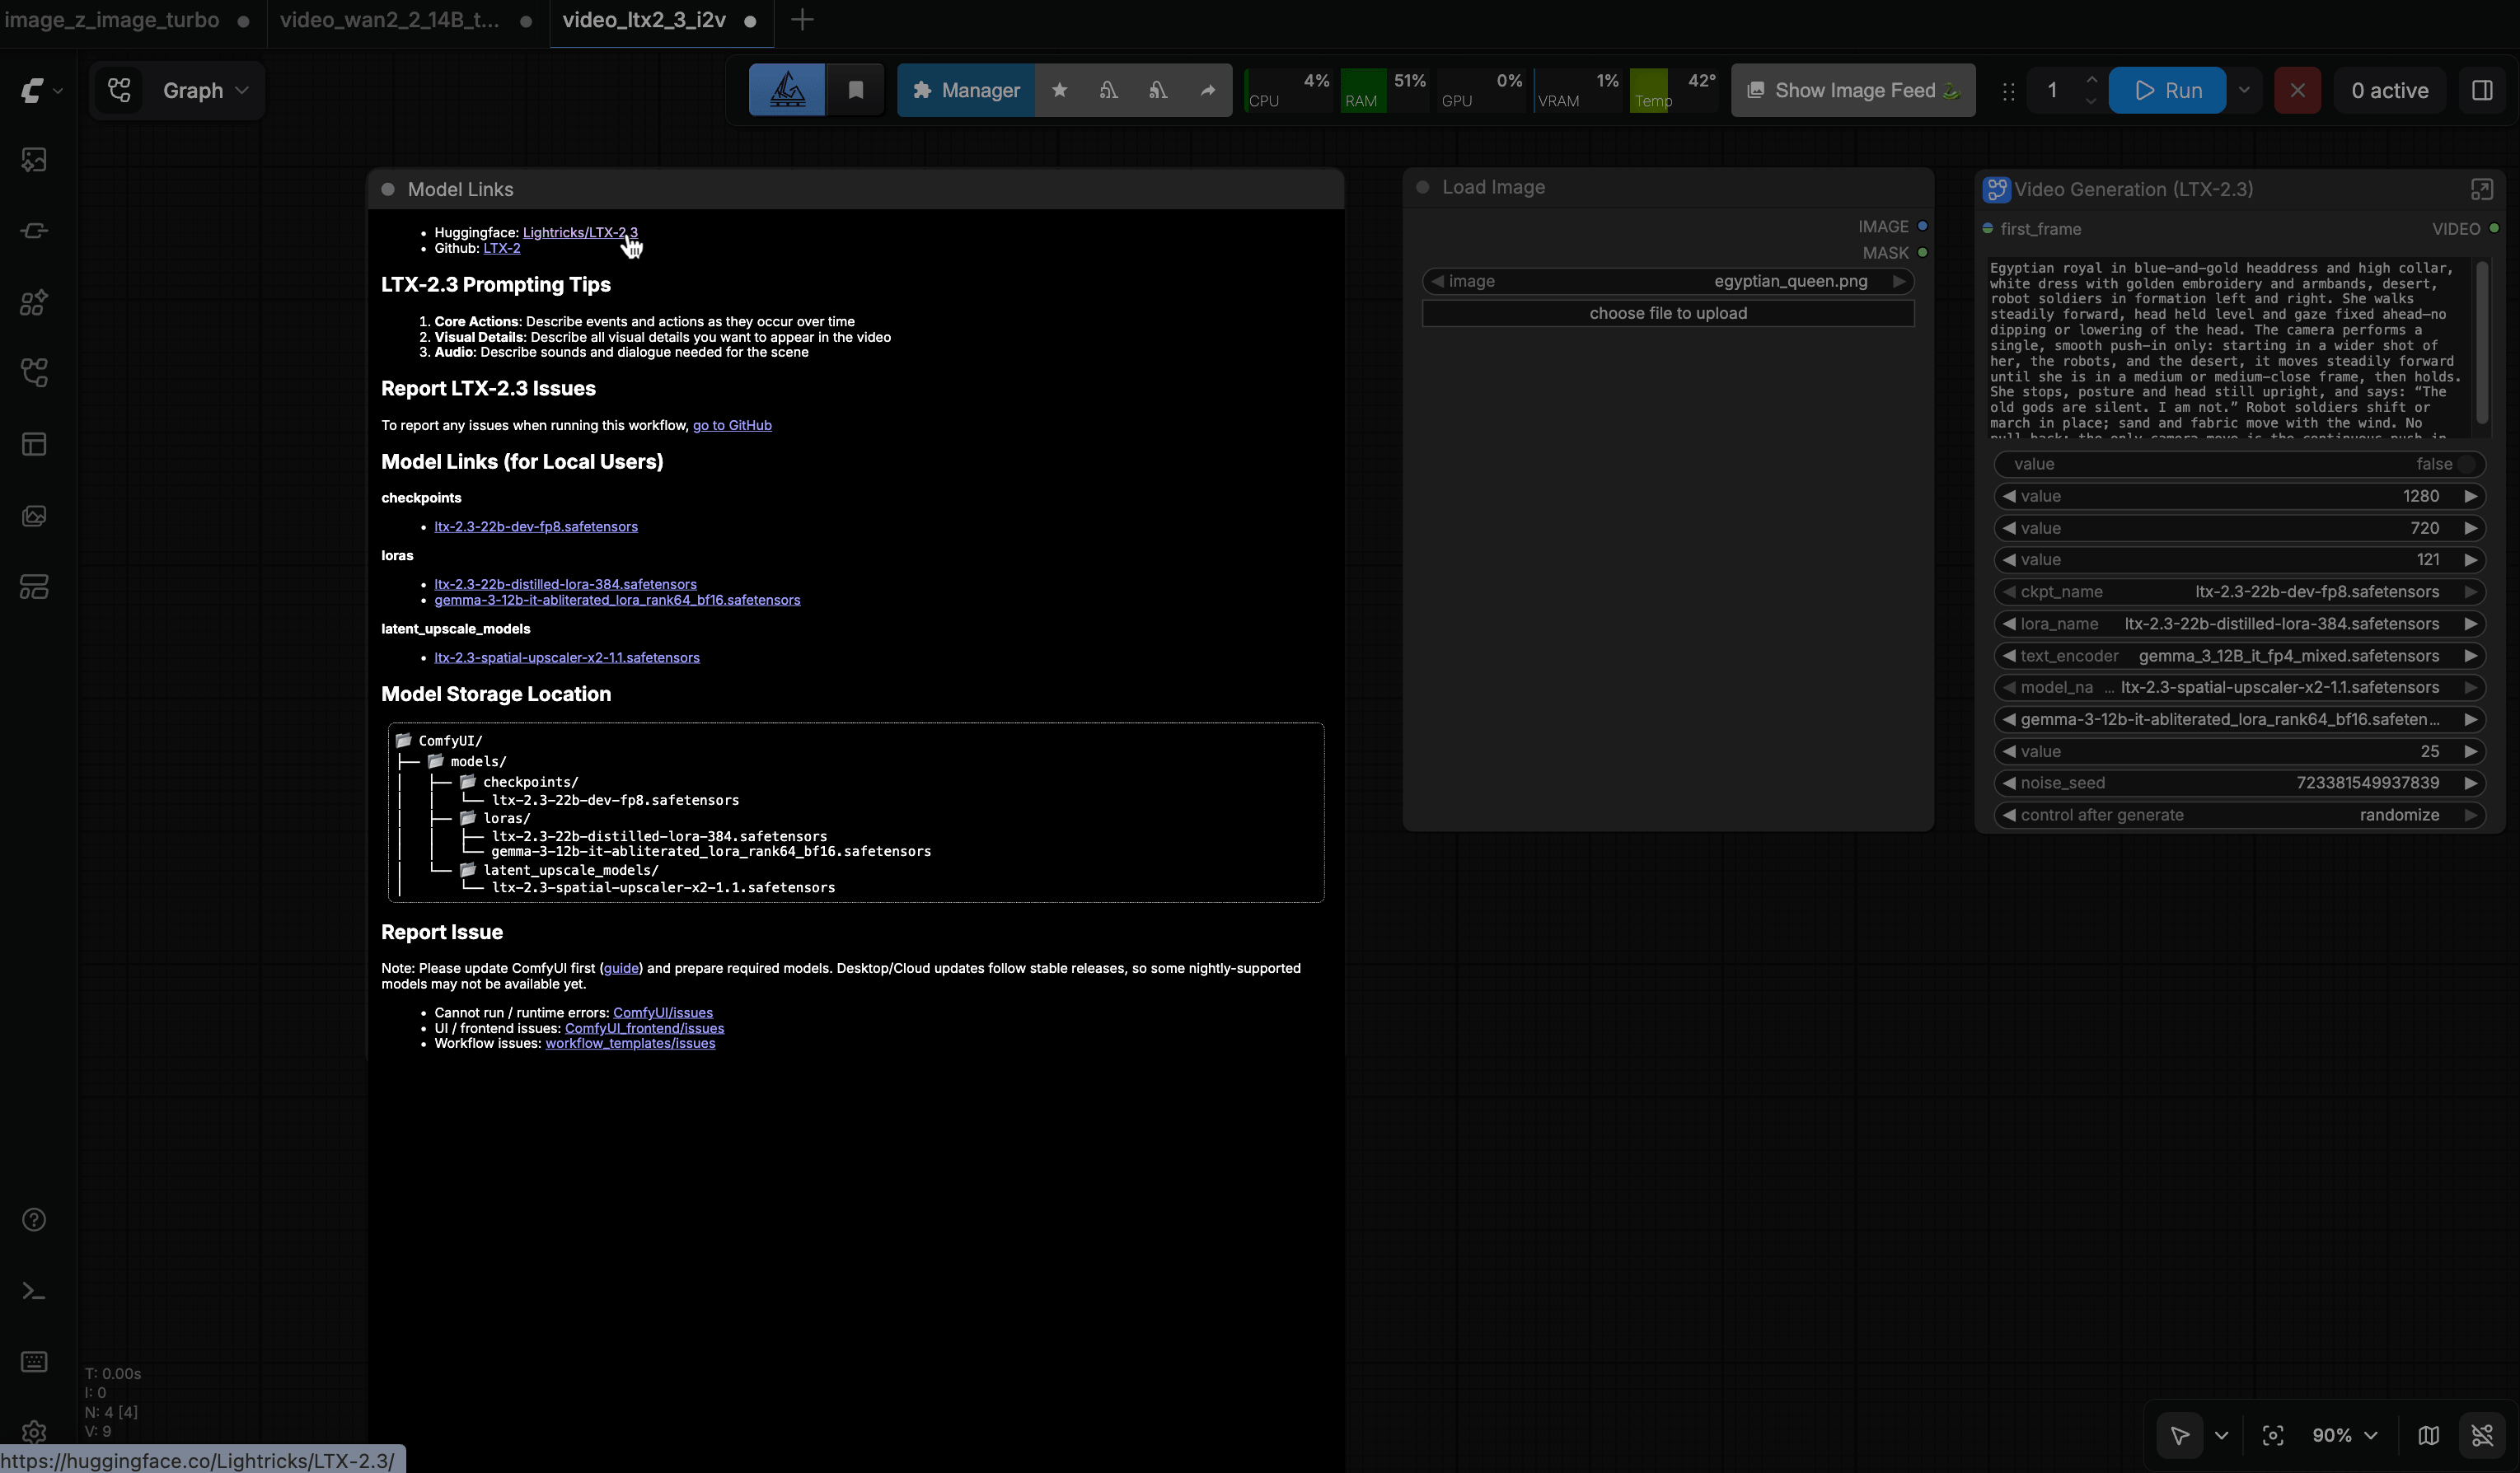
Method 2: Use a browser helper extension
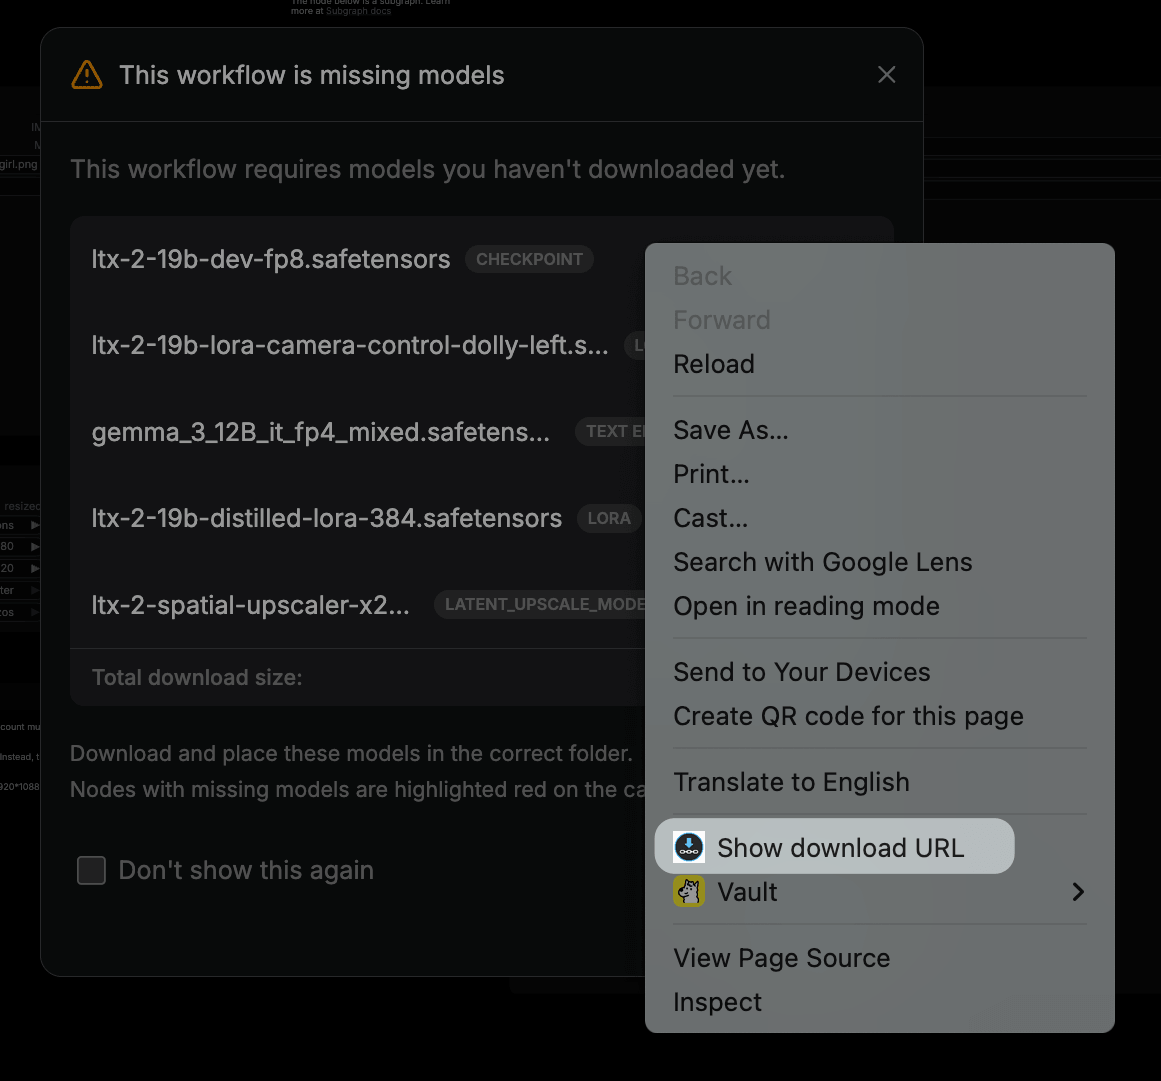
If the template shows a missing-model dialog and does not expose the full URL, use a browser helper extension like WAN Download URL Helper:
- Open the missing-model dialog in ComfyUI.
- Hover over a download icon.
- Right-click the icon and choose Show download URL.
- Copy the URL, then use it in your downloader or save it for manual download.
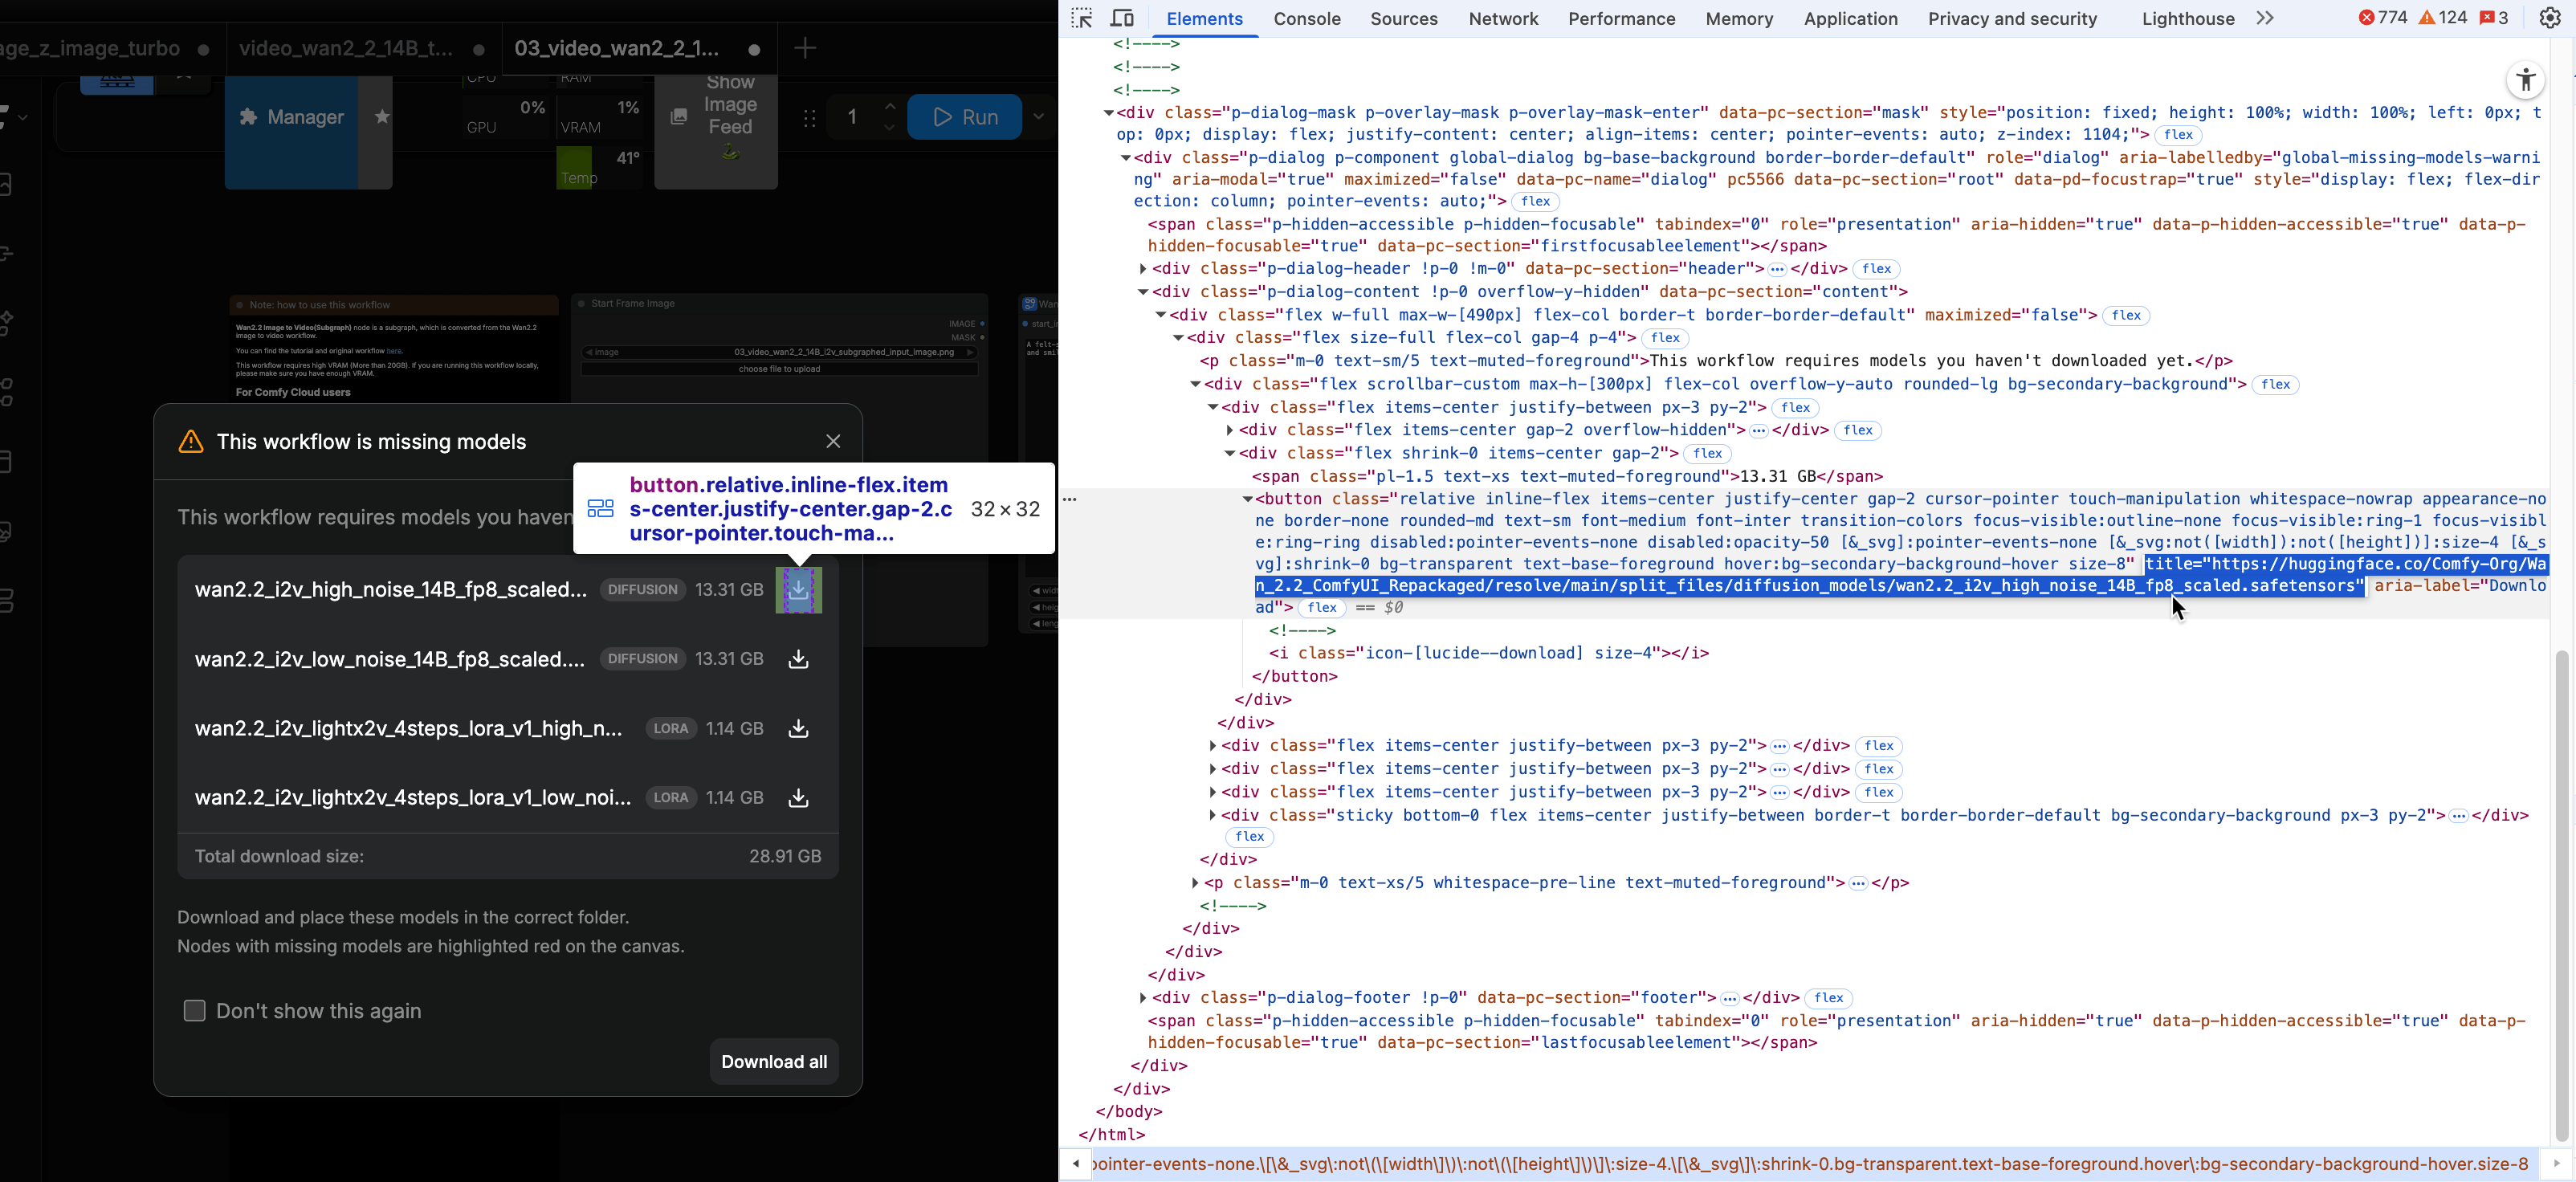
Method 3: Inspect the page in browser developer tools
If the URL is not shown in the template notes or dialog, inspect the page in your browser developer tools and look for network requests triggered by the template or missing-model dialog.
CPU temperature rises unusually high on Olares One
When a workflow requires more VRAM than your graphics card has, the system places heavy load on a single CPU core to swap data, driving the temperature high.
The long-term fix is to reduce the VRAM footprint of your workflow (for example, lower resolution, use a smaller model, or enable model offloading). As a temporary workaround, limit the maximum CPU frequency while the workload is running.
Olares OS 1.12.6 or later
Olares One ships with a CPU whose default maximum frequency is 5.4 GHz. Use the Limit CPU frequency switch to lower it to 5.0 GHz during the workload, then turn the switch off when the workload completes.
- Open Settings.
- Select your avatar in the top-left corner to open My Olares.
- Under My hardware, turn on Limit CPU frequency.
- Run your task in ComfyUI.
- After the workload completes, turn off Limit CPU frequency.
For more details, see Limit CPU frequency.
Olares OS 1.12.5 or earlier
If your device is running Olares OS 1.12.5 or earlier, use terminal commands to lower the maximum CPU frequency during the workload, then restore it afterward.
Open the Control Hub app.
In the left sidebar, under Terminal, click Olares.
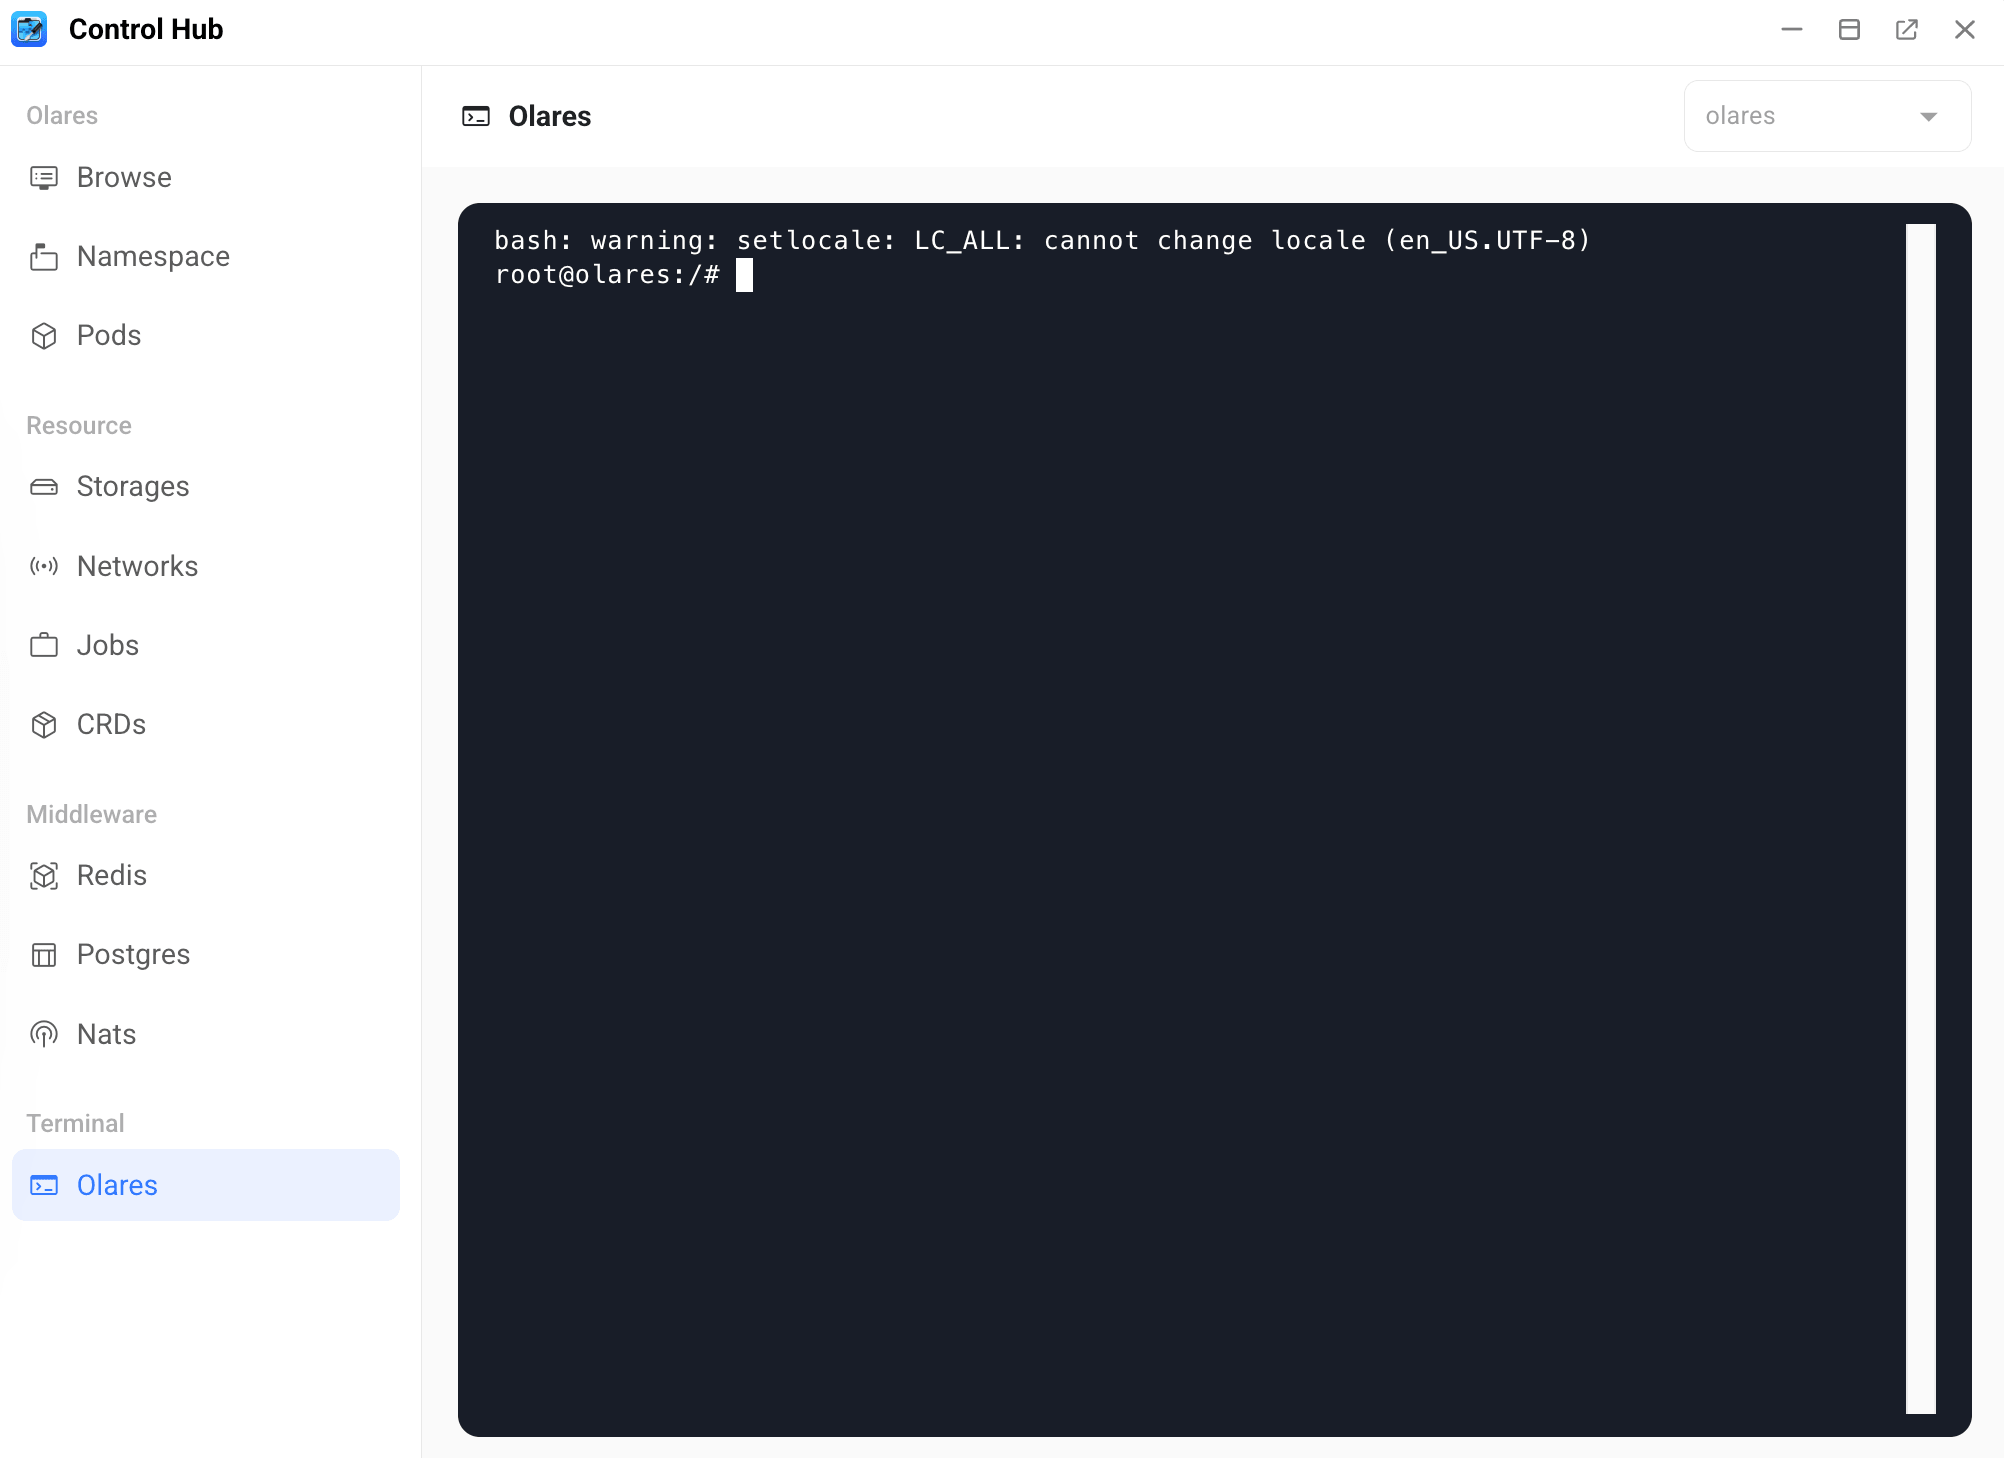
Run the following command to lower the maximum CPU frequency to 5.0 GHz:
bashecho 5000000 | sudo tee /sys/devices/system/cpu/cpufreq/policy*/scaling_max_freqOn other devices, adjust the target value based on your CPU's maximum frequency. Run
cat /sys/devices/system/cpu/cpufreq/policy0/cpuinfo_max_freqto check it first.Run your task in ComfyUI.
After the workload completes, run the following command to restore the default maximum CPU frequency of 5.4 GHz:
bashecho 5400000 | sudo tee /sys/devices/system/cpu/cpufreq/policy*/scaling_max_freq