Install Olares on PVE via ISO with GPU passthrough
GPU passthrough in Proxmox Virtual Environment (PVE) lets virtual machines (VMs) access the physical GPU directly, enabling hardware-accelerated computing for workloads like AI model inference and graphics processing.
Not for production use
Currently, Olares on PVE has certain limitations. Use it only for development or testing purposes.
Learning objectives
By the end of this tutorial, you will be able to:
- Enable GPU passthrough on a PVE host.
- Create a PVE VM with an NVIDIA GPU passed through.
- Install Olares from the official ISO and verify the GPU is recognized.
Prerequisites
Make sure you have:
- CPU: At least 4 cores, with IOMMU enabled in BIOS
- Intel:
VT-d - AMD:
AMD-Vi/IOMMU
- Intel:
- GPU: NVIDIA GPU that supports GPU passthrough
- RAM: Recommended 16 GB or more
- Storage: Minimum 200 GB SSD (installation may fail on HDD)
- PVE version: 8.3.2
- Olares ISO image: Download the official Olares ISO image
Configure GPU passthrough in PVE
To use GPU-accelerated workloads in Olares, first enable GPU passthrough on the PVE host.
Enable IOMMU
Input-Output Memory Management Unit (IOMMU) is a hardware feature that lets the operating system control how devices access memory. This control is required for passthrough.
In the PVE Shell, open the GRUB configuration file:
bashnano /etc/default/grubFind the line:
plainGRUB_CMDLINE_LINUX_DEFAULT="quiet"Replace it with the line for your CPU vendor:
bashGRUB_CMDLINE_LINUX_DEFAULT="quiet intel_iommu=on iommu=pt"bashGRUB_CMDLINE_LINUX_DEFAULT="quiet amd_iommu=on iommu=pt"Save and close the file, then update GRUB and reboot the host:
bashupdate-grub rebootAfter the host restarts, check whether IOMMU is enabled:
bashdmesg | grep -e DMAR -e IOMMUIf successful, you should see output similar to:
plain[0.061644] DMAR: IOMMU enabled ... [0.408103] DMAR: Intel(R) Virtualization Technology for Directed I/Oplain[1.219719] AMD-Vi: Found IOMMU at 0000:00:00.2 cap 0x40
Add VFIO modules
Virtual Function I/O (VFIO) enables a VM to directly access PCI devices such as GPUs.
On the PVE host, open the
modulesfile:bashnano /etc/modulesAdd these lines to the end of the file:
plainvfio vfio_iommu_type1 vfio_pci vfio_virqfdSave and close the file.
Blacklist host GPU drivers
Blacklist the host's default GPU drivers so the GPU is available for vfio-pci.
Create the blacklist configuration:
bashnano /etc/modprobe.d/blacklist.confAdd the following lines to block NVIDIA drivers:
plainblacklist nouveau blacklist nvidia blacklist nvidiafb blacklist nvidia_drm blacklist nvidia_modesetSave and close the file.
Bind GPU to VFIO
On the PVE host, find your GPU's PCI address:
bashlspci | grep NVIDIAExample output:
plain01:00.0 VGA compatible controller: NVIDIA Corporation AD106 [GeForce RTX 4060 Ti] (rev a1) 01:00.1 Audio device: NVIDIA Corporation AD106M High Definition Audio Controller (rev a1)In this example, the GPU's PCI address is
01:00, with two functions listed.Get the PCI identifiers of your GPU:
bashlspci -n -s 01:00Example output:
plain01:00.0 0300: 10de:2803 (rev a1) 01:00.1 0403: 10de:22bd (rev a1)In this case, the GPU IDs are
10de:2803and10de:22bd.Bind the IDs to VFIO (replace the IDs with your own):
bashecho "options vfio-pci ids=10de:2803,10de:22bd" > /etc/modprobe.d/vfio.confUpdate the
initramfsand reboot:bashupdate-initramfs -u rebootAfter the host restarts, check that the GPU is using the
vfio-pcidriver:bashlspci -vYou should see output similar to:
plain01:00.0 VGA compatible controller: NVIDIA Corporation AD106 [GeForce RTX 4060 Ti] (rev a1) (prog-if 00 [VGA controller]) Subsystem: Gigabyte Technology Co., Ltd AD106 [GeForce RTX 4060 Ti] Flags: fast devsel, IRQ 255, IOMMU group 11 ... Kernel driver in use: vfio-pci
Set up VM and install Olares
With GPU passthrough enabled, you can now install Olares in PVE.
Create and configure the VM
Upload the official Olares ISO to your PVE storage (for example,
local):- In the PVE web interface, select your target storage.
- Click ISO Images > Upload.
- Click Select File, choose the Olares ISO file, and click Upload.
Click Create VM.
Configure the VM as follows:
- OS:
ISO image: Select the official Olares ISO image you downloaded.
- System:
BIOS: Select OVMF (UEFI).EFI Storage: Choose a storage location, for example a local LVM or directory, to store UEFI firmware variables.Pre-Enroll keys: Uncheck to disable Secure Boot.
- Disks:
Disk size (GiB): At least 200 GB.
- CPU:
Cores: At least 4 cores.
- Memory:
Memory (MiB): At least 8 GB.
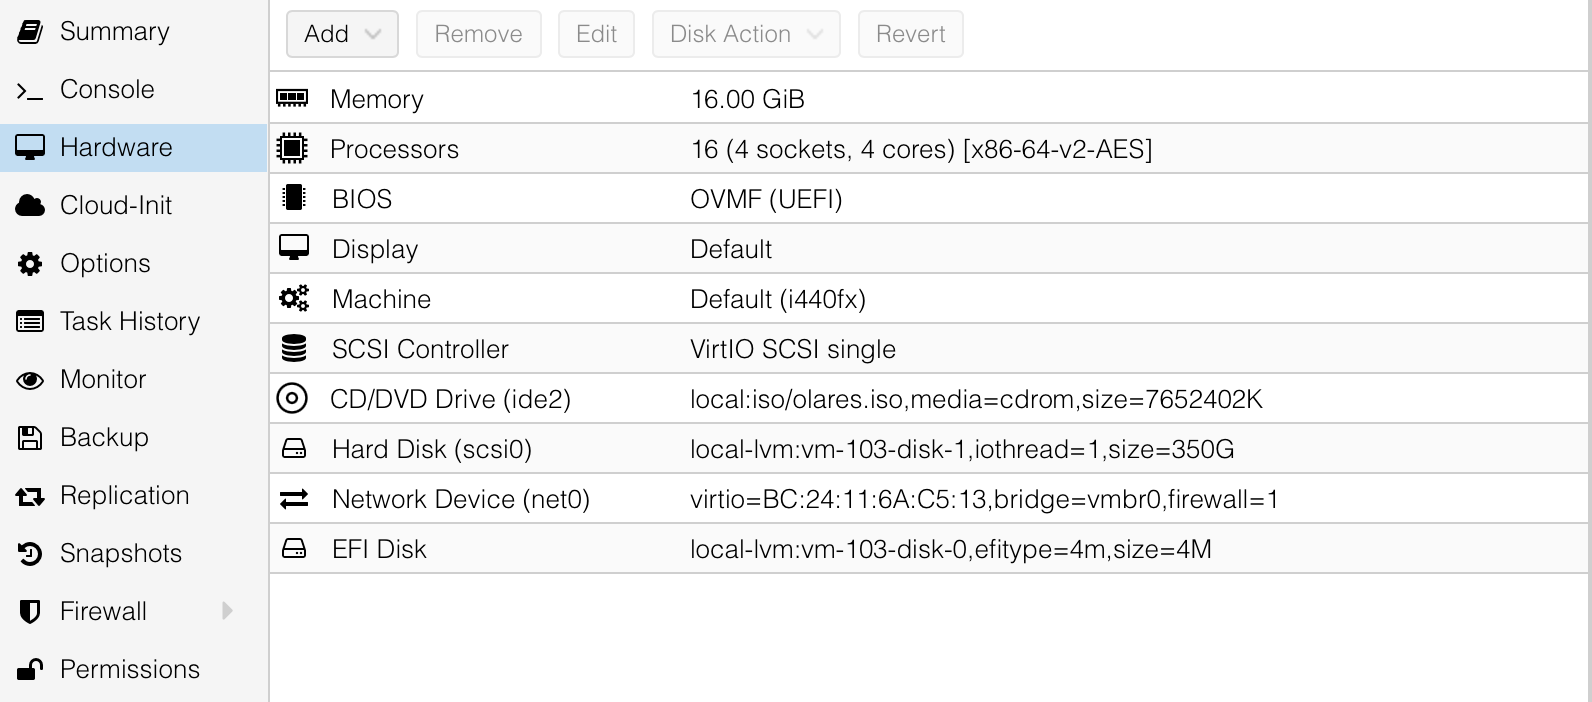
The following screenshot shows the sample hardware configuration.
- OS:
Click Finish. Do not start the VM yet.
Bind GPU to the VM
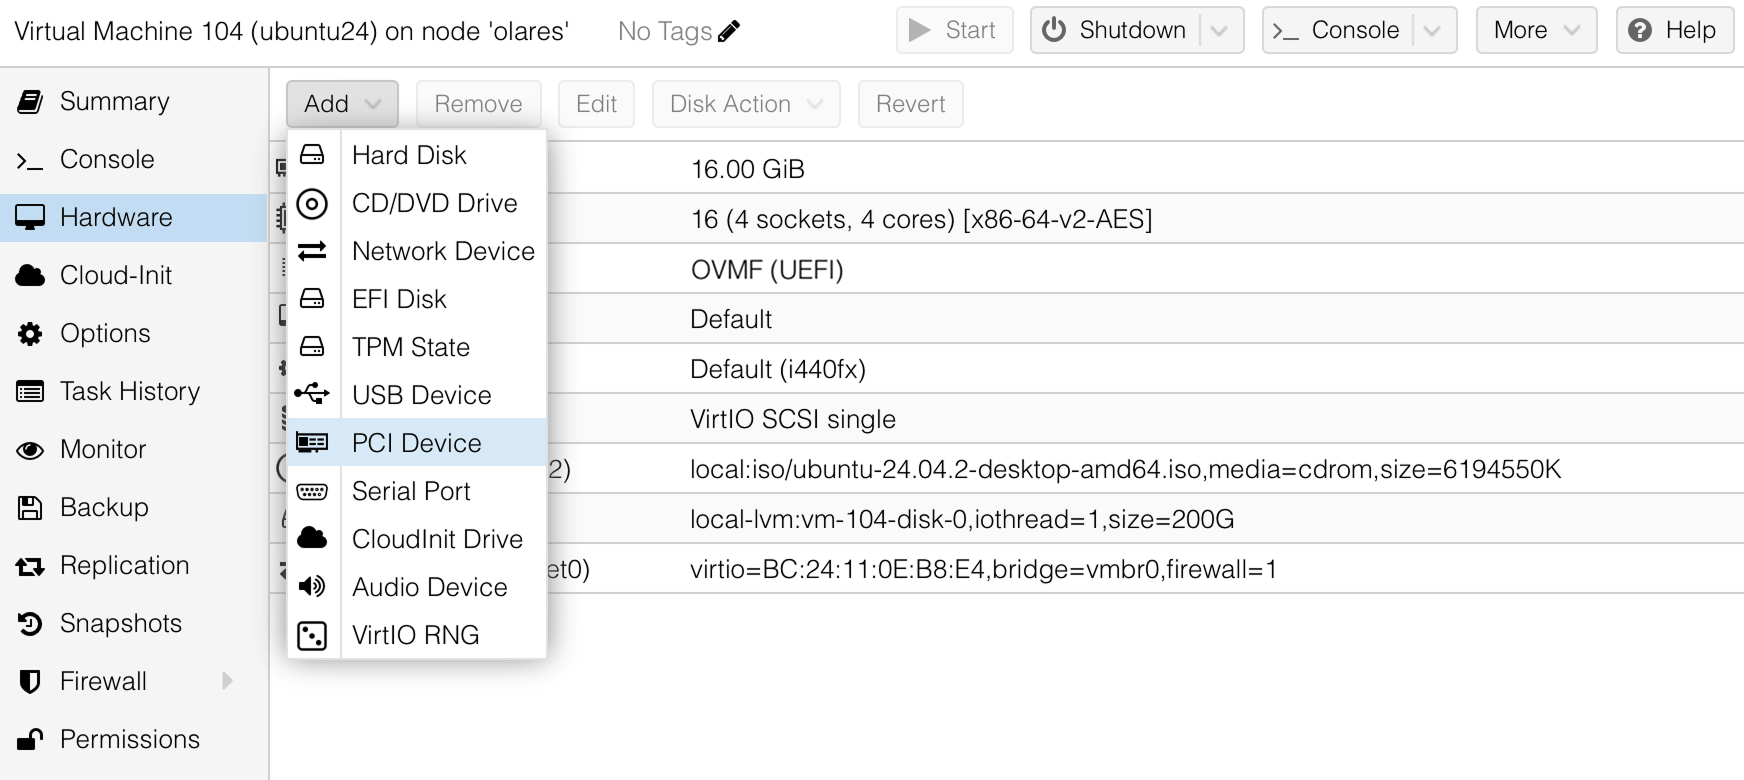
In the PVE interface, select your VM and go to Hardware > Add > PCI Device.
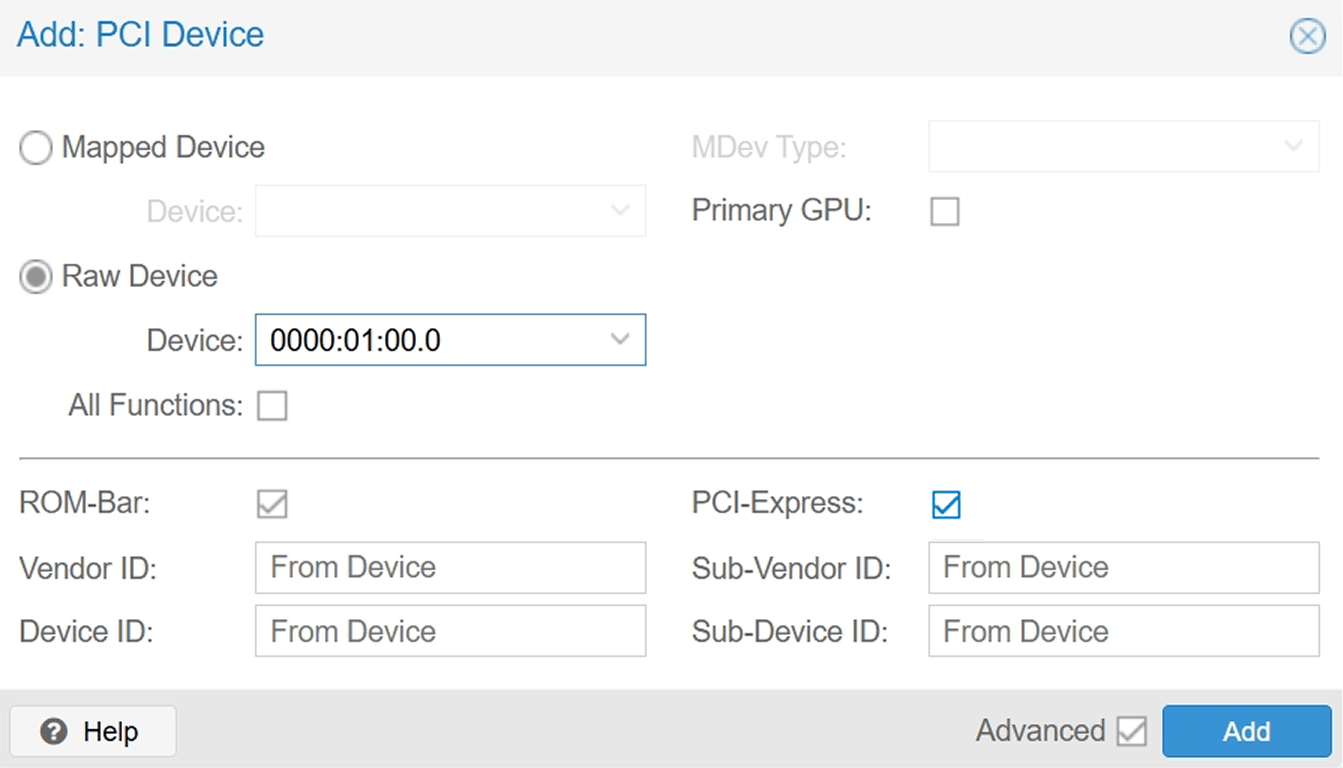
Select Raw Device, then pick your GPU by the PCI address (for example,
01:00).In the bottom-right corner, select Advanced and check PCI-Express.
Click Add.
Now your VM is ready to use GPU passthrough.
Install Olares
Install Olares from the ISO image:
Select and start the VM you just created.
From the boot menu, select Install Olares to Hard Disk and press Enter.
In the Olares System Installer interface, select the installation disk:
- Review the list of available disks (for example,
sda 200G QEMU HARDDISK). - Select the first disk by typing
/dev/plus its name (for example,/dev/sda). - When the disk warning appears, type
yesto continue.
Ignore NVIDIA driver warnings
During installation, warnings related to the NVIDIA graphics driver will appear. Press Enter to dismiss them.
- Review the list of available disks (for example,
Once the installation completes, you'll see the message:
plainInstallation completed successfully!In the Proxmox web interface, reboot the VM.
Verify the installation and GPU passthrough
After the VM restarts, it boots into Ubuntu.
Log in to Ubuntu using the default credentials:
- Username:
olares - Password:
olares
- Username:
Run the following command to confirm that Olares installed successfully:
bashsudo olares-checkThe installation is successful if you see output like:
plain... check Olaresd: success check Containerd: successCheck that the GPU is passed through and recognized by Olares using the NVIDIA System Management Interface tool:
bashnvidia-smiIf GPU passthrough is set up correctly, this command displays a table with your NVIDIA GPU details, including its name, driver version, and memory usage.
Finish installation and activate Olares
Same network required
To avoid activation failures, ensure that both your phone and the Olares device are connected to the same network.
Open LarePass app on your phone.
On your Olares activation page, tap Discover nearby Olares. LarePass will list the detected Olares instances in the same network.
Select the target Olares instance from the list and tap Install now.

When the installation completes, click Activate now.
In the Select a reverse proxy dialog, select a node that is closer to your geographical location. The installer will then configure HTTPs certificate and DNS for Olares.
Note
- You can change this setting later on the Change reverse proxy page in Olares.
- If your Olares device is connected to a public IP network, this step will be skipped automatically.
Follow the on-screen instructions to set the login password for Olares, then tap Complete.
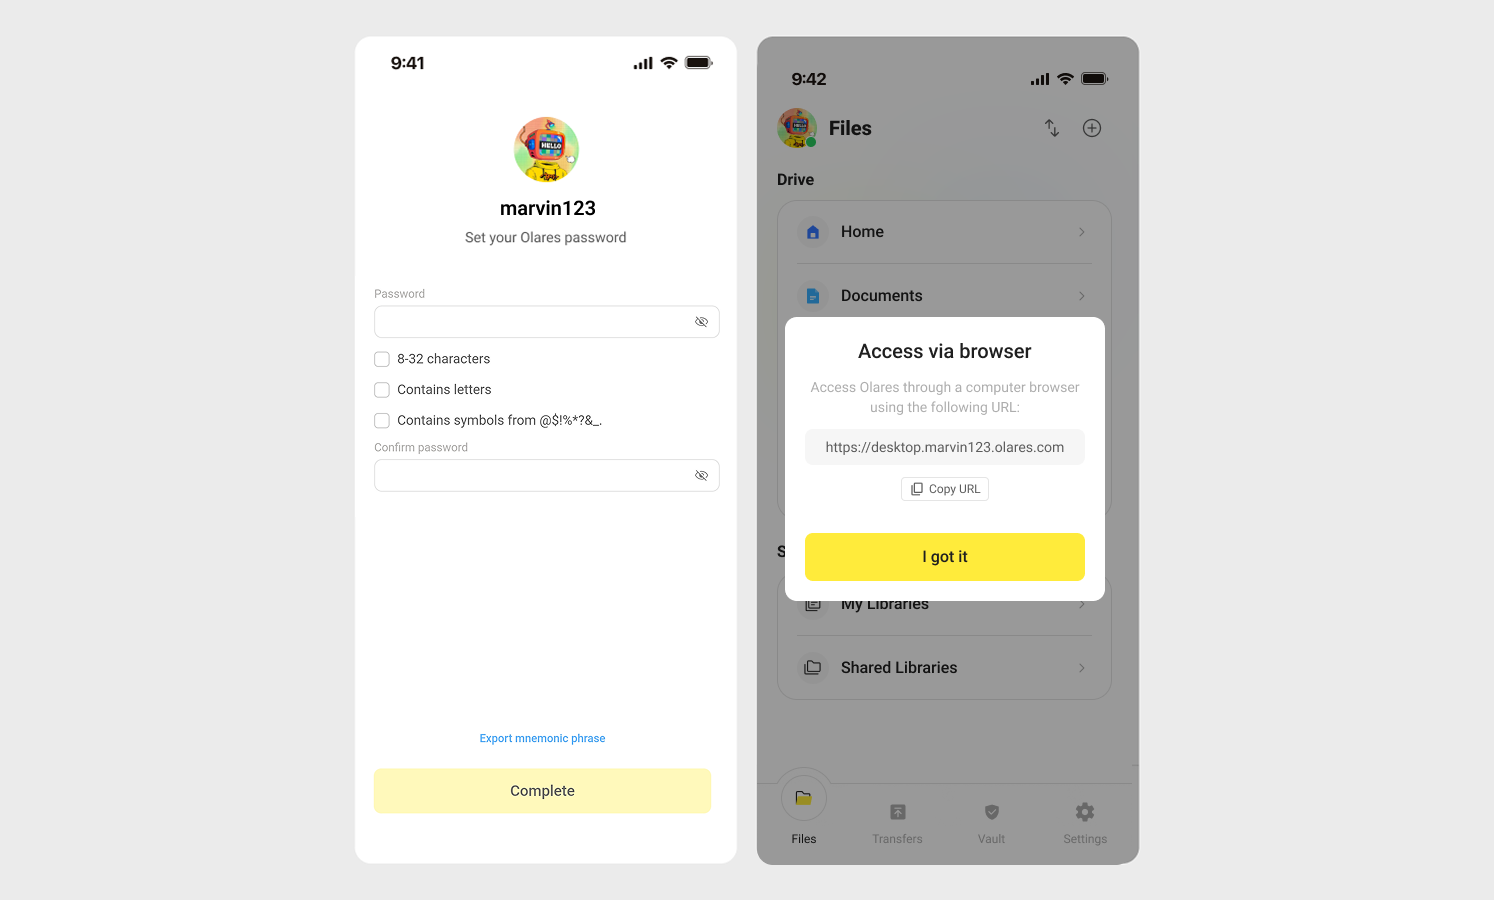
Once activation is complete, LarePass will display the desktop address of your Olares device, such as https://desktop.marvin123.olares.com.
Log in to Olares
Open the Olares desktop address in your browser, and press any key to continue.
On the login page, enter your Olares login password.

You will be prompted to complete two-factor verification:
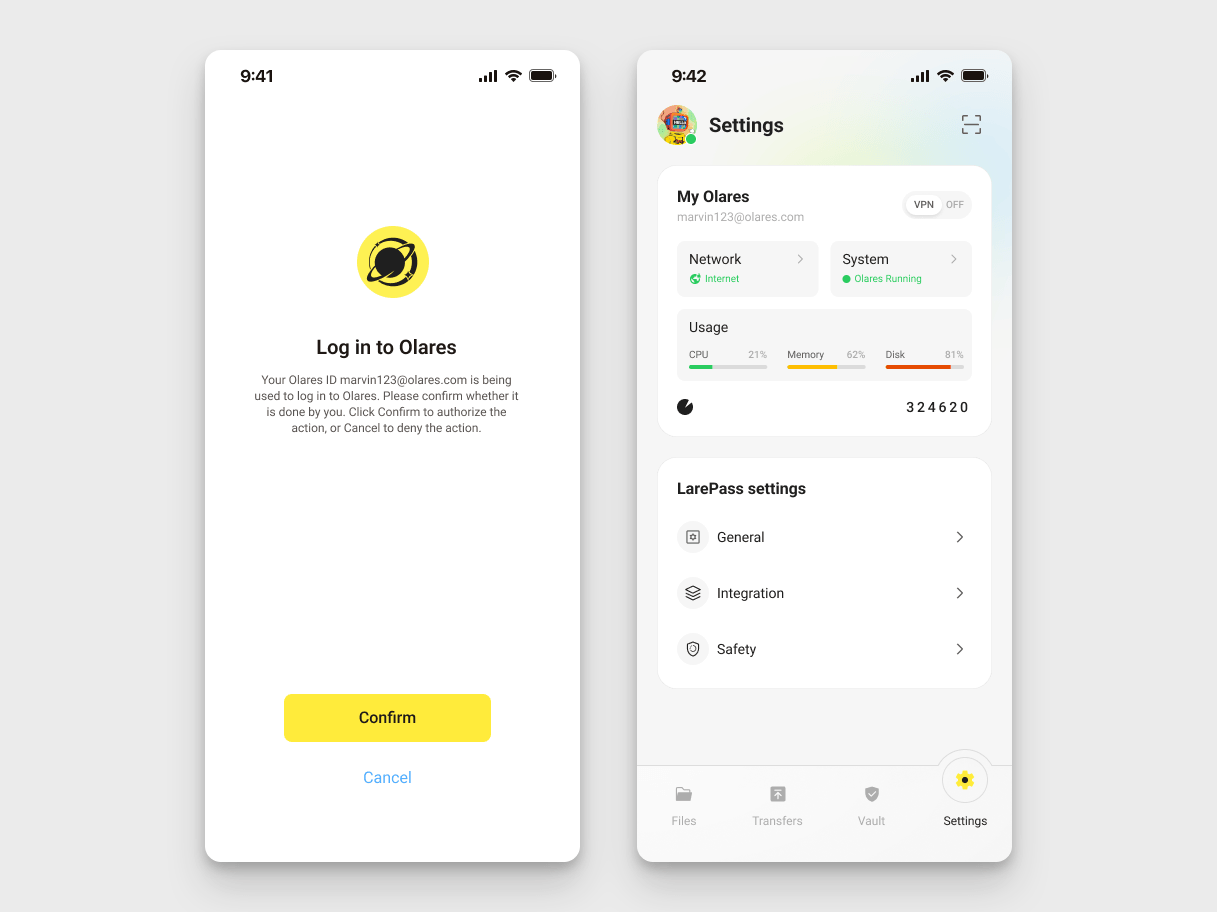
- Confirm on LarePass: Open the login notification on your phone, and tap Confirm.
- Enter the code manually: Select Verify using one time password from LarePass on the login page. Get the 6-digit code from the LarePass app on your phone (Settings > My Olares card, tap the authenticator) or from the LarePass desktop client (Vault, the first item in the list), and enter it to complete the login.
INFO
The verification code is time-sensitive. Ensure you enter it before it expires.
Once you've logged in, you'll be directed to the Olares desktop.🎉