
Keep Your NAS, Add a Personal Cloud: What Goes Where?


You don’t need to replace a NAS that already serves your files well. Keep it as the home for your source files and run the new apps on a separate app host. Then decide where each app keeps its own data and how you will reach it.
A person browsing family photos on a phone at home
That split is the core of a NAS personal cloud. Storage stays where it already works, and the personal cloud layer adds the services and access paths the NAS doesn’t provide. Connecting a share, running an app, and reaching that app from outside your home are three different results, so each one gets its own check.
Keep the NAS for files; add an app layer for services
Your NAS keeps doing the job it already does well, which is holding the source files. The new layer runs the apps, and two more decisions sit next to it.
A personal cloud with an existing NAS has four parts, and each part has its own owner:
- Source files on the NAS. Photos, videos, and documents stay in the shares they live in today. Adding an app is not a reason to move everything.
- App runtime on an app host. This is the software layer or platform running the service, whether on a separate personal cloud OS, home server, or other supported host. Conceptually, it is a distinct role from raw file storage. Even when both layers sit on the same local network, that placement alone does not grant access to NAS folders.
- App-managed data. Databases, settings, caches, thumbnails, and generated output belong to the app. The app’s own documentation decides where they go. They don’t automatically sit next to your originals.
- Access route. This is how your phone, laptop, or TV reaches the app or the files. It is a separate path that you plan and check on its own.
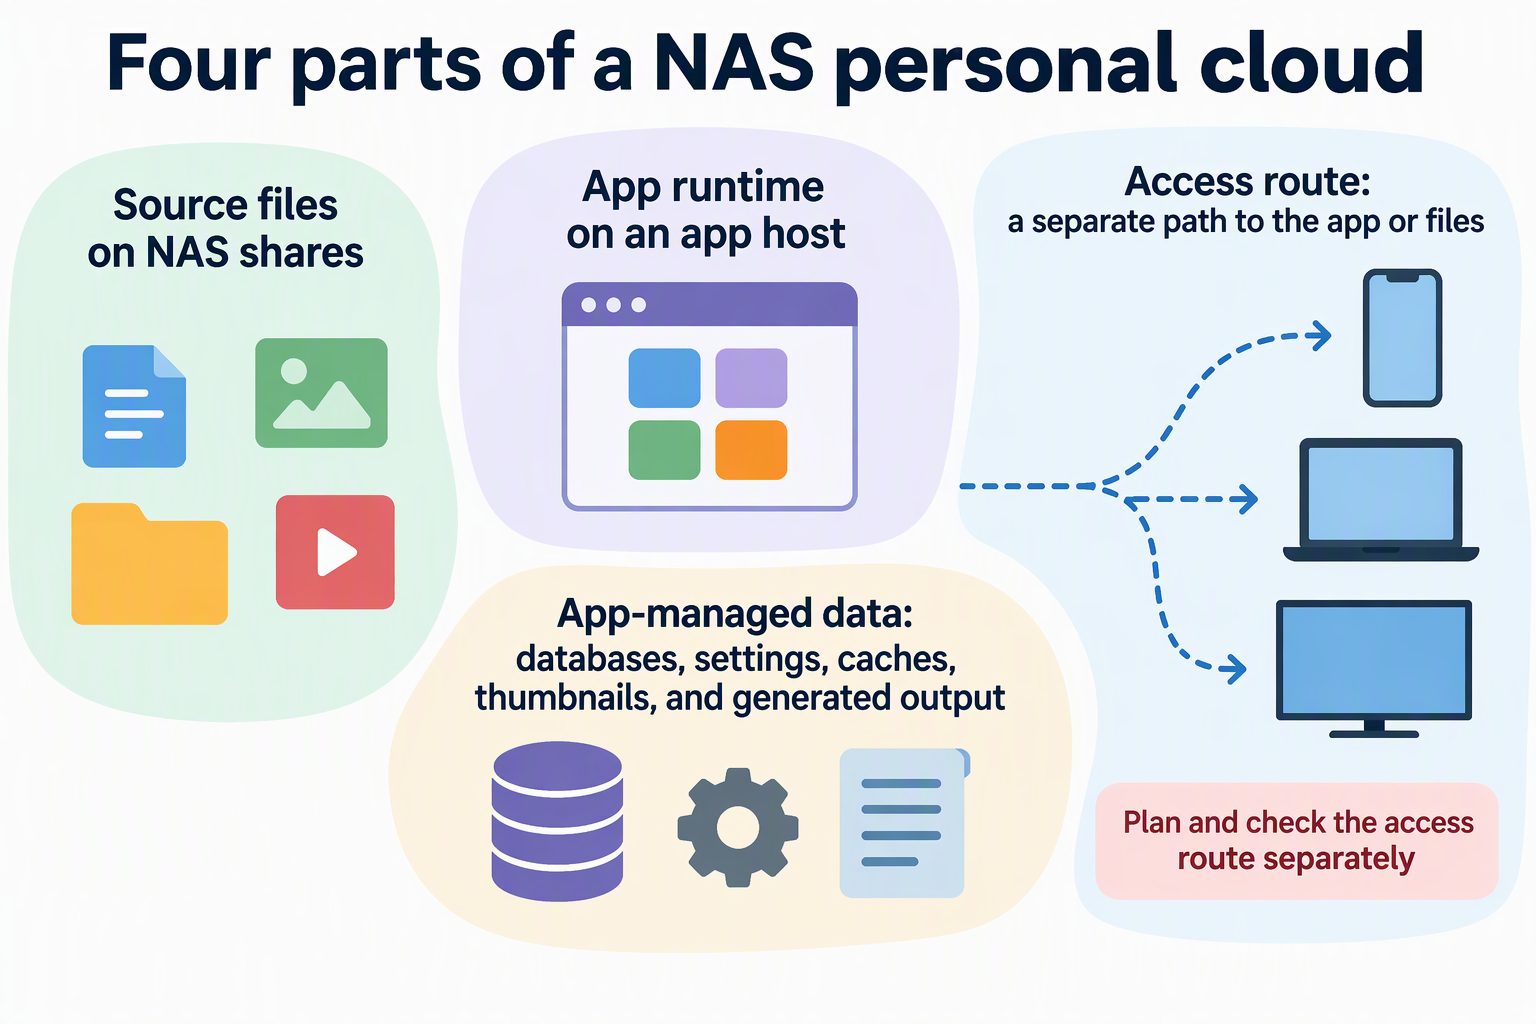
Here is an illustrative example. A household keeps its family photo archive in a NAS share and wants a photo timeline app. The archive stays in the share, and the app runs on the app host. The app’s database and thumbnails go wherever the app’s setup guide puts them. Browsing the timeline on a phone at home is one route. Browsing it during a trip is a second route that needs its own setup.
Write this map down before you install anything. It keeps each question separate, so a success in one part doesn’t get mistaken for a success in another. It also shows what your data actually includes. The originals live on the NAS, and the app-managed data lives wherever the app keeps it. If you only protect the NAS, you might miss the second half.
Choose the app’s NAS data path before connecting it
Have an app read a NAS share directly only when two things are documented: the platform can connect that share, and the app can use the resulting path with the access mode you need. If either half is missing, use the app’s own documented import, copy, or sync method. If no documented route exists, treat the connection as unverified.
The two-sided check works like this. On the platform side, confirm that the app host can connect the share over the protocol your NAS offers, such as SMB or NFS, and note where the share appears. On the app side, confirm that the app can read that exact path, and check whether it gets read-only or read-write access. Read-only vs. read-write matters because it controls whether the app can change your originals.
The platform half alone is not enough. In our Olares OS, Files can connect a NAS share over SMB or NFS. An SMB connection needs the same local network, the share path, and your NAS account and password. A connected share appears under External in Files. Third-party apps run on Olares in their own containers, though, and a folder you can see in Files is not automatically at the same path inside every app. Before you point an app at that folder, check the app’s own mount directory and permissions.
Immich, a photo and video app, shows what a fully documented app-side path looks like. Immich external libraries track files stored outside Immich. When you scan one, Immich loads the photos and videos from disk and creates matching assets in its timeline. Its Docker example maps a NAS folder into the container for this purpose. The scan reads the files where they already are. The documentation does not describe it as copying originals into Immich’s own storage.
The conditions matter as much as the feature. Immich’s external library guide assumes Immich runs in Docker and the files sit in a readable directory on the same machine. Managing the library requires administrator access. You add the path as the container sees it, then run a scan. The guide says to keep :ro on the mount if Immich should not delete images or write XMP sidecar files through that mount. Getting the NAS share onto that machine in the first place is the platform-side half, and you handle it separately.
Some apps don’t read a share in place. They import, copy, or sync files instead. For those apps, write down four things from the documentation: the source, the destination, the direction, and whether changes flow back to the NAS. A copy creates a second set of files that the app manages. That set is not the same as the originals, even when the content matches.
If neither path is documented for your app and platform, don’t fill the gap with a generic mount trick. Pick an app or host with a documented route, or keep the files where they are until one exists.
Check local and remote access as separate paths
First, decide which destination you want to reach: the app’s interface, the NAS files, or both. Each destination needs its own route at home and its own route away from home. A route that works on one doesn’t prove the other.
Testing at home tells you that a device on your home network can reach the target. It says nothing about reaching that same target from a coffee shop or a hotel. Mounting a NAS share on the app host doesn’t make the share reachable from the internet either. That connection only gives the host a path to the files.
Immich’s documentation shows why the destination matters. Its reverse-proxy option is a remote route to the Immich service: clients connect to the proxy over HTTPS from outside your local network, and the proxy passes the traffic to Immich. That route reaches the app, not the NAS share behind it. Immich also warns that depending on your configuration, both the web interface and the API may be exposed to the internet. Before you choose that option, decide whether that exposure is acceptable for your household.
For each destination you want to reach remotely, look for documentation that covers three things. The first is the app endpoint or file path. The second is the identity or login the route uses. The third is the route itself. If the documentation covers only the app, then the app is the only thing you have confirmed as reachable.
Also keep “local” separate from “private” or “secure.” Running an app on hardware at home tells you where it runs. Your actual configuration and data paths decide who can reach it and what they can see.
FAQs
Can a photo app delete or edit files on my NAS?
It depends on the access mode the app gets to the files. With Immich’s Docker external libraries, a mount that ends in :ro stops Immich from deleting images or adding XMP sidecar files through that mount. Removing :ro allows those actions. For any other app, look up whether its documented path is read-only or read-write before you connect your originals.
Will an Immich external library also hold my phone uploads and database?
An external library is specifically documented to track and scan files stored outside Immich on disk. Current documentation does not establish where Immich keeps its own uploads or database. Plan that placement separately using Immich’s setup documentation, and include it when you decide what to protect.
If I save my NAS login in Olares, will shares mount automatically?
No. In Olares, Settings → Integration → SMB account management lets you save a NAS account for reference. You still type the credentials by hand when you mount an SMB share. Keep your NAS username and password handy for each new connection.