Install Olares on Windows (WSL 2) with Docker image
You can use Docker to install and run Olares in a containerized environment. This guide walks you through setting up Olares with Docker and WSL 2, preparing the installation environment, completing the activation process, and managing the container lifecycle.
Not recommended for production use
Currently, Olares on Windows has certain limitations including:
- Lack of distributed storage support
- Inability to add local nodes.
We recommend using it only for development or testing purposes.
Having trouble with installation?
If you encounter issues during the installation process, feel free to submit a GitHub Issue. Please include the following information when submitting:
- The platform or environment you're using (e.g., Ubuntu, Docker, WSL, etc.).
- The installation method (script installation or Docker image).
- Detailed error information (including logs, error messages, or screenshots).
System requirements
Make sure your Windows meets the following requirements.
- CPU: At least 4 cores
- RAM: At least 16GB of available memory
- Storage: At least 150GB of available SSD storage.
- Supported systems:
- Windows 10 or 11
- Linux (on WSL 2): Ubuntu 22.04 LTS or later; Debian 12 or later
SSD required
The installation will likely fail if an HDD (mechanical hard drive) is used instead of an SSD.
Before you begin
Before you begin, ensure the following:
- Docker Desktop is installed and running on your system.
WSL 2 and Hyper-V
If Docker Desktop is configured to use Hyper-V, GPU support for Olares cannot be enabled. Ensure Docker Desktop is set to run in the WSL 2 mode.
- You know the IP address of the current device.
View IP Address
In PowerShell or Command Prompt, use the following command to confirm your IP address:
bashipconfig | findstr /i "IPv4.*192" - You have created an Olares ID via LarePass.
Configure WSL 2
Open PowerShell and run the following command to confirm the kernel version of WSL installed on your system:
powershellwsl --versionExample output:
PowerShellWSL version: 2.4.8.0 Kernel version: 5.15.167.4-1 WSLg version: 1.0.65 MSRDC version: 1.611.1-81528511 DXCore version: 10.0.26100.1-240331-1435.ge-release Windows version: 10.0.26100.3475Run
docker infoand look for theCgroupversion section as shown below. Make sure it is v2.powershell... Cgroup Driver: cgroupfs Cgroup version: 2Use the link provided to download the appropriate kernel file matching your version:
https://dc3p1870nn3cj.cloudfront.net/bzImage-<kernel-version>. For example, For kernel version5.15.167.4, download the file fromhttps://dc3p1870nn3cj.cloudfront.net/bzImage-5.15.167.4.Supported kernel versions (above
5.15.146.1) are:linux-msft-wsl-5.15.146.1linux-msft-wsl-5.15.150.1linux-msft-wsl-5.15.153.1linux-msft-wsl-5.15.167.4linux-msft-wsl-6.6.75.1linux-msft-wsl-6.6.36.6linux-msft-wsl-6.6.36.3
Set the default version of WSL to version 2:
wsl --set-default-version 2- In the directory
C:\Users\<YourUsername>\, create a file named.wslconfigwith the following content:txt[wsl2] kernel=c:\\path\\to\\your\\kernel\\bzImage-<version> # Note: Use double backslashes (\\) as path separators memory=8GB # Recommended: 16GB swap=0GBINFO
If you installed Docker Desktop before modifying the
.wslconfigfile, it is recommended to remove thedocker-desktopdistribution installed under WSL:bashwsl --unregister docker-desktop wsl --unregister docker-desktop-data # If this version exists - Restart your computer to apply the changes.
Prepare Docker
If you have installed Docker Desktop before modifying .wslconfig, remove docker desktop then restart Windows.
Run olaresd-proxy
- Download
olaresd-proxyfrom the following link:https://dc3p1870nn3cj.cloudfront.net/olaresd-proxy-v0.1.0-windows-amd64.tar.gz. - Extract the file and start the
olaresd-proxyexecutable.Keep
olaresd-proxyrunningEnsure that
olaresd-proxyruns in the background during the installation and activation of Olares.
Run Olares using the Docker CLI
CUDA version requirements
CUDA version 12.4 or above is required for GPU support. Older versions are incompatible.
Run the following command to pull the Olares image. Replace <host ip> with your device's IP address and <olares version> with the desired version of Olares:
docker run -d --privileged -v oic-data:/var \
  -e HOST_IP=<host ip> \
  -p 80:80 \
  -p 443:443 \
  -p 30180:30180 \
  -p 18088:18088 \
  -p 41641:41641/udp \
  --name oic \
beclab/olares:<olares version>docker run --gpus all -d --privileged -v oic-data:/var \
-e HOST_IP=<host ip> \
-p 80:80 \
-p 443:443 \
-p 30180:30180 \
-p 18088:18088 \
-p 41641:41641/udp \
--name oic \
beclab/olares:<olares version>where:
-d: Starts the container in detached mode to allow it to run in the background.--privileged: Grants the container elevated privileges.-v oic-data:/var: Binds a Docker volume (oic-data) to the/vardirectory inside the container to persist data.-e HOST_IP=<host ip>: Specifies the host device's IP address as an environment variable.-p 80:80: Maps port80on the host to port80in the container.-p 443:443: Maps port443on the host to port443in the container.-p 30180:30180: Maps port30180on the host to port30180in the container.-p 18088:18088: Maps port18088on the host to port18088in the container.-p 41641:41641/udp: Maps UDP port41641on the host to UDP port41641in the container.--name oic: Names the containeroic(Olares in container) for easier reference.beclab/olares:<olares version>: Specifies the Olares Docker image and version. For example:beclab/olares:1.11.5.
When the container is running, you will see a container ID output.
Do not add the --rm flag
The --rm flag automatically deletes the container after it stops. If this happens, you will not be able to restart the container and will need to reinstall Olares to run it again. Omitting this flag preserves the container after stoppage, enabling you to resume it with thedocker start command.
Finish installation and activate Olares
Same network required
To avoid activation failures, ensure that both your phone and the Olares device are connected to the same network.
Open LarePass app on your phone.
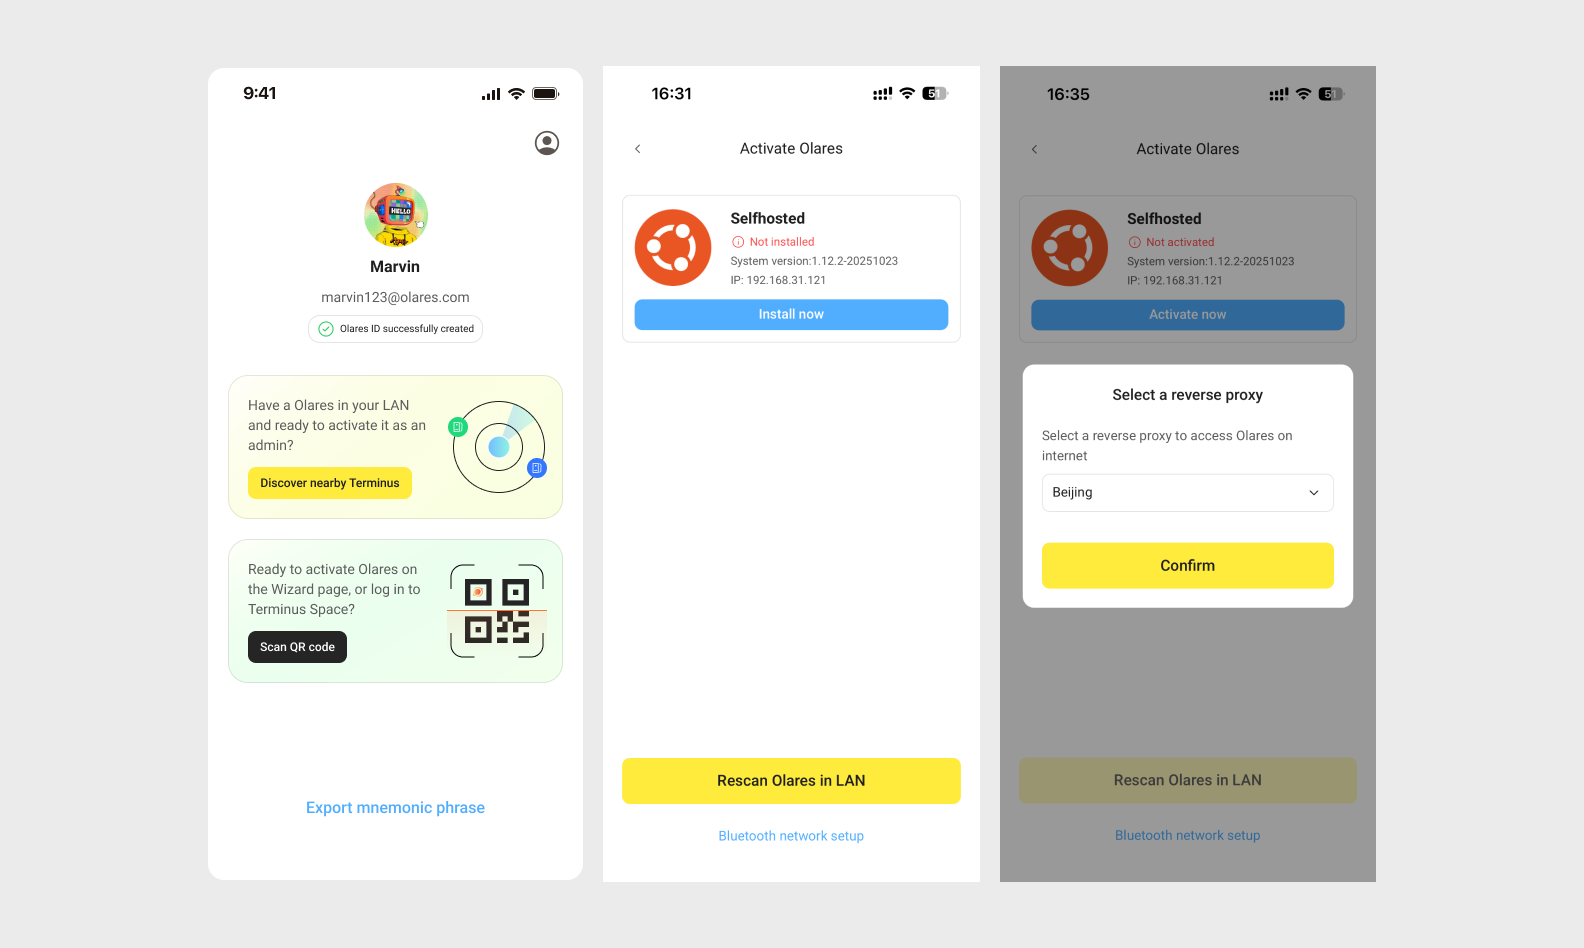
On your account activation page, tap Discover nearby Olares. LarePass will list the detected Olares instances in the same network.
Select the target Olares instance from the list and tap Install now.
When the installation completes, click Activate now.
In the Select a reverse proxy dialog, select a node that is closer to your geographical location. The installer will then configure HTTPs certificate and DNS for Olares.
Note
- You can change this setting later on the Change reverse proxy page in Olares.
- If your Olares device is connected to a public IP network, this step will be skipped automatically.
Follow the on-screen instructions to set the login password for Olares, then tap Complete.

Once activation is complete, LarePass will display the desktop address of your Olares device, such as https://desktop.marvin123.olares.com.
Manage the Olares container
Stop the container
To stop the running container:
docker stop oicRestart the container
To restart the container after it has been stopped:
docker start oicUninstall the container
To completely remove the container and its associated data:
docker stop oic
docker rm oic
docker volume rm oic-data
Next step: Protect your Olares ID
You're almost ready to start using Olares! Before diving in, it's crucial to ensure your Olares ID is securely backed up. Without this step, you won't be able to recover Olares ID if needed.