Generate and Save a First Image with ComfyUI


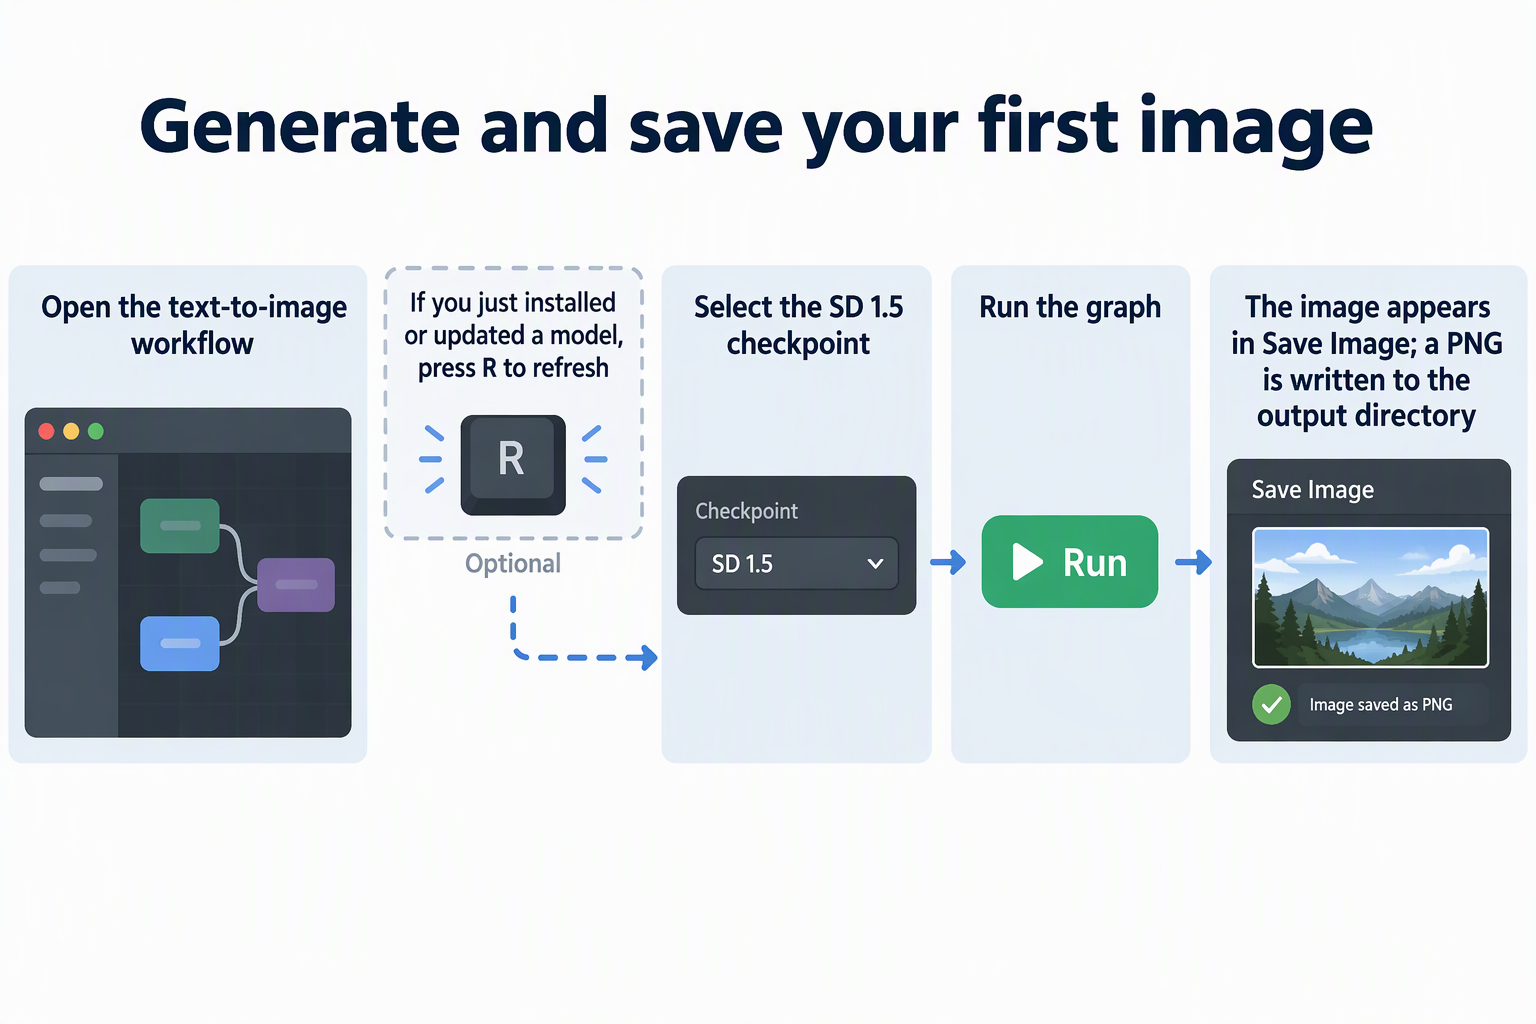
To make your ComfyUI first image, open the default text-to-image workflow, select the SD 1.5 checkpoint in the Load Checkpoint node, and click Run. The picture appears in the Save Image node. That node also writes a PNG file to your ComfyUI output directory.
You can then get the image in two ways. You can use the PNG where ComfyUI saved it, or you can right-click the result to save a separate local copy. This guide assumes ComfyUI is already running and the SD 1.5 model file is installed.
Generate the first image in ComfyUI
For a first run, follow the official example exactly. The steps below run ComfyUI’s documented SD 1.5 workflow, from opening the graph to seeing the finished image.
A few terms first. A workflow is a graph of connected boxes called nodes, and each node does one job. A checkpoint is the model file that actually creates the picture. In this example, the Load Checkpoint node loads that file and the Save Image node shows the output.
- Open the workflow. Download the official text-to-image.json example using GitHub’s raw-file download. In ComfyUI, use Workflows > Open to load the saved JSON. The official tutorial also provides an example image with embedded workflow data that you can drag onto the canvas.
- Refresh models if you just added one. After you install or update models, press R so the selector picks up the new files.
- Select the checkpoint. In the Load Checkpoint node, make sure v1-5-pruned-emaonly-fp16.safetensors is selected.
- Run the graph. Click Run or press Ctrl+Enter.
- Check the result. When generation finishes, the image appears in the Save Image node. That image is your success signal.
Keep the documented checkpoint selected for this first test. That way your result comes from the same setup the guide describes, which makes any problem easier to trace. The model name and steps above belong to this SD 1.5 example. Other workflows may load different models, so follow their own instructions when you move on.
If step 5 shows an image, generation worked. The next job is making sure you can find that image later, and that part works a bit differently than many beginners expect.
Save and find the generated image
When the built-in Save Image node completes successfully, it writes a PNG in the output directory of the ComfyUI instance running the workflow. If that instance runs on a server, the file is on the server; download a separate copy if you want it on your laptop.
Use the filename shown with the generated result to identify the output. A subfolder may also be configured in the workflow. Check your installation’s output directory rather than assuming the file was saved to the Downloads folder of the device displaying the browser.
There is no single folder path that works for every setup. The location depends on how and where your copy of ComfyUI is installed. A path copied from someone else’s guide may point to the wrong place on your system. Start from your installation’s output directory and use the filename the node reports.
The second option is a separate copy. In the documented workflow, you can right-click the image in Save Image to save a local copy from the result. This step does not move or replace the PNG in the output directory. It creates another copy wherever you save it. Note that location, because seeing an image on screen does not mean a local copy exists yet.
For one image, saving a local copy from the result is convenient. For a collection of results, use the output directory of the instance that generated them.
If the checkpoint is missing
Sometimes the Load Checkpoint node shows no models or displays null. In that case the workflow has no model to run, so fix it before you click Run. For an empty or null checkpoint list, ComfyUI’s guide says to verify where the model is installed and then refresh or restart ComfyUI.
Work through it in this order. First, confirm that v1-5-pruned-emaonly-fp16.safetensors is in the model location your installation reads from. Next, press R to refresh and open the Load Checkpoint selector again. If the file still isn’t listed, restart ComfyUI and check once more.
When the filename shows up, select it and go back to the run step. If it never appears, check the model location again and verify your installation path. This check covers only the empty or null checkpoint case. A run that fails for another reason needs its own troubleshooting guidance.
FAQs
Is the image in the Save Image node already a file?
Yes. The Save Image node writes a PNG to the ComfyUI output directory when it shows the result, so a file exists even if you never right-click. A right-click save only adds a second copy somewhere else.
What file format does ComfyUI use for the saved image?
The built-in Save Image node saves images as PNG files. If you need a different format for sharing or editing, convert a copy in another tool and keep the original PNG.
Can I change the prompt and generate another image?
Yes. In the default workflow, the prompt text sits in the CLIP Text Encode nodes. Edit that text, run the graph again, and compare the new output with your first image. Each run that reaches Save Image writes another PNG, and its filename appears in the node’s file details.
Will the SD 1.5 checkpoint work with any workflow I download?
Don’t assume it will. v1-5-pruned-emaonly-fp16.safetensors is the checkpoint named for this first-generation example. Other workflows may be built for different models, so check which checkpoint each one expects before you run it.
Why doesn’t this guide list an exact output folder path?
ComfyUI can be installed in different ways and places, and the output directory belongs to each instance. The filename and subfolder reported by the Save Image node give you a reliable way to find the file inside your own installation’s output directory.